Zatca E-invoicing API
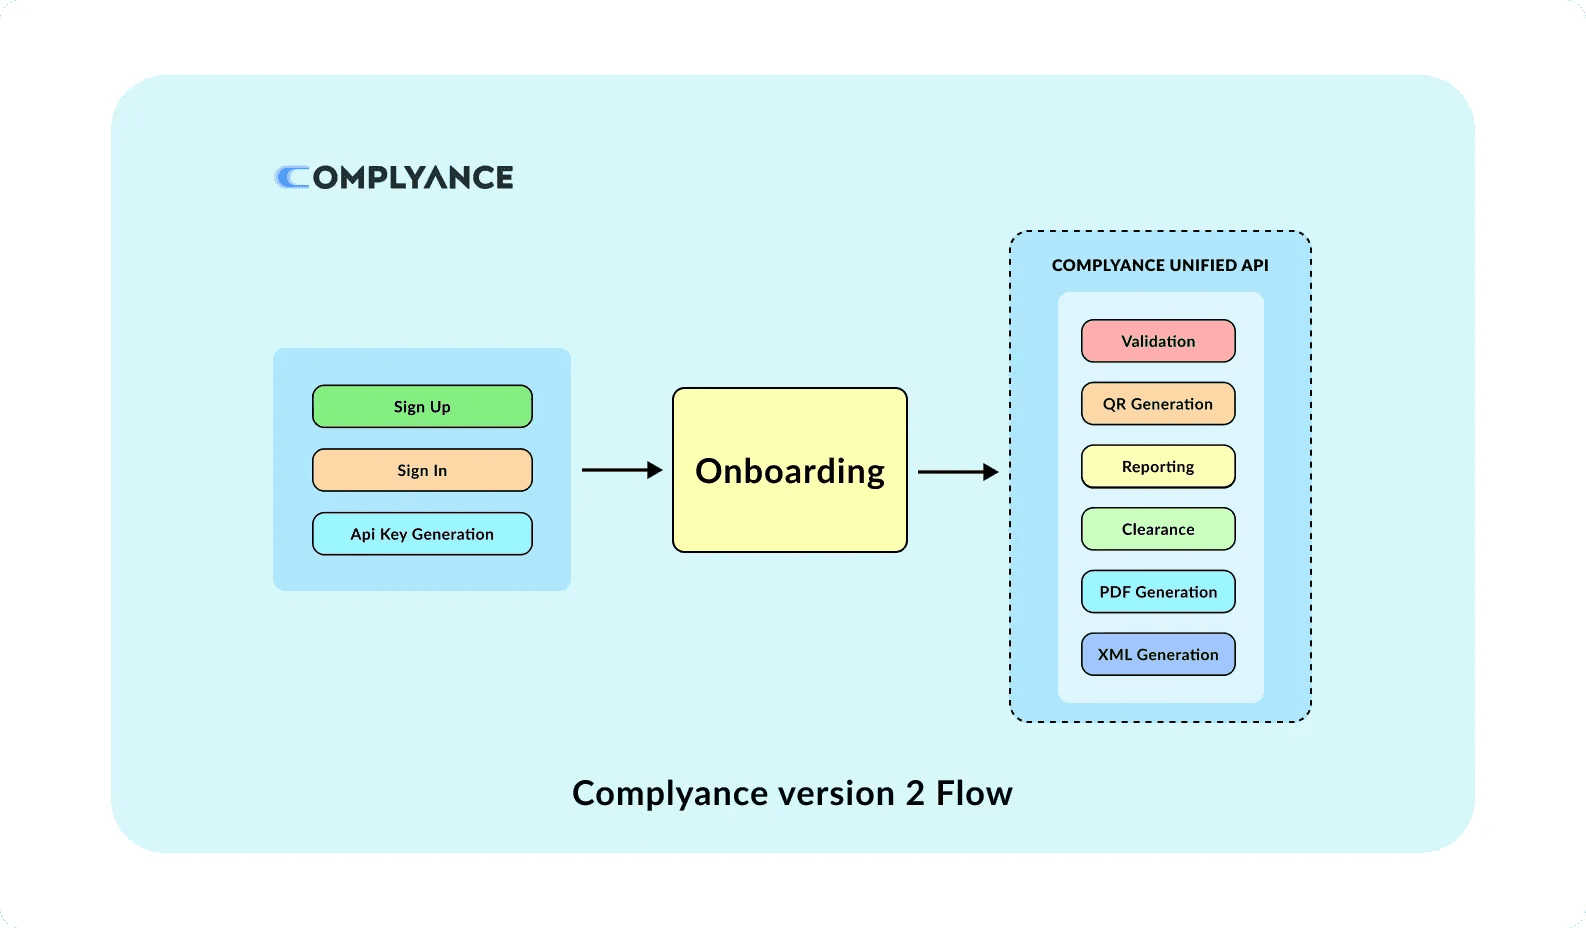
The V2 release introduces the 'Unify API,' a single endpoint consolidating previously disparate functionalities.
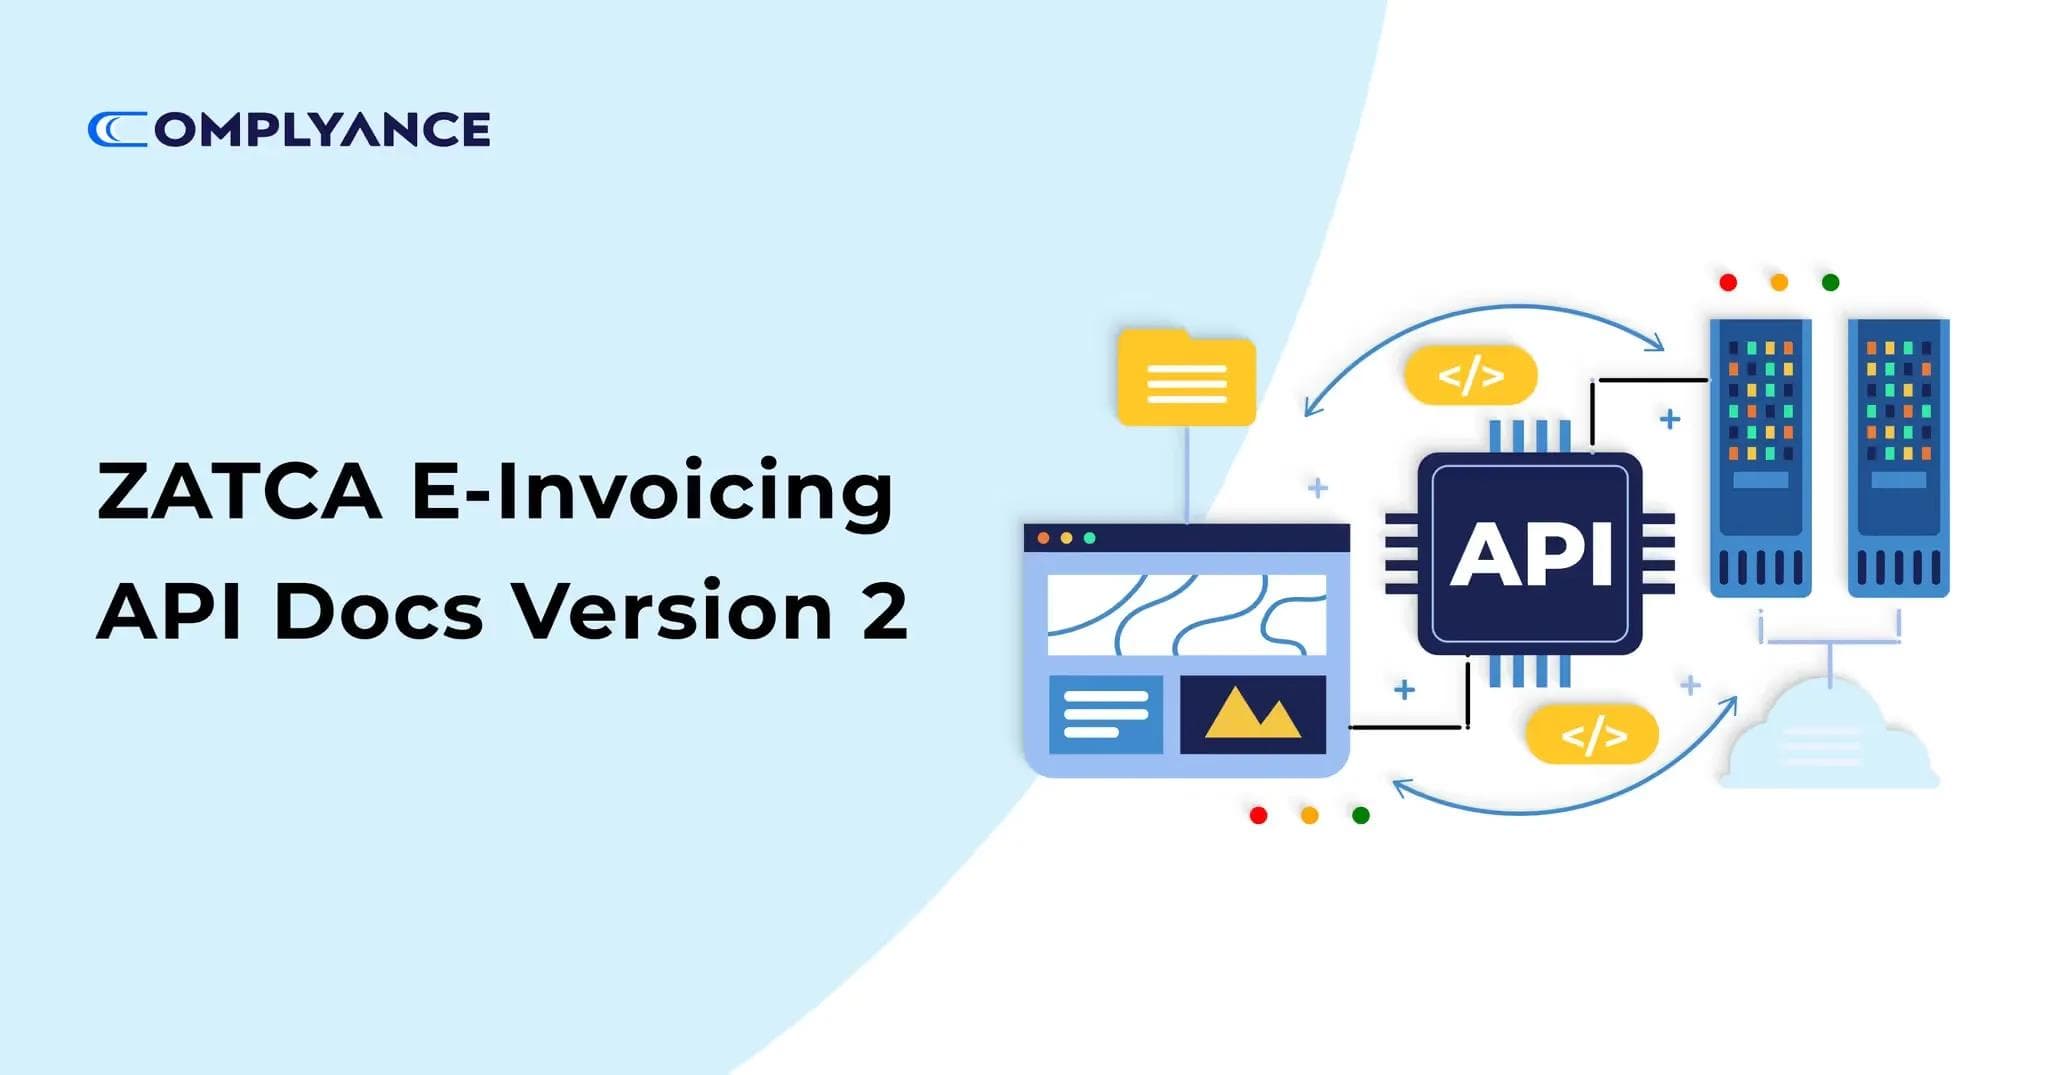
Table of Contents
Zatca E-invoicing APIs
Introducing the Enhanced Complyance ZATCA E-Invoicing API Version 2
Streamlining E-Invoicing with a Unified Approach: The Kingdom of Saudi Arabia's Zakat, Tax, and Customs Authority (ZATCA) has set a new standard in e-invoicing to optimize business processes and ensure tax compliance. In this evolving landscape, Complyance is at the forefront, simplifying the e-invoicing experience with its innovative ZATCA E-Invoicing API. The introduction of Version 2 represents a significant leap forward, consolidating three critical functionalities into a single, efficient API key.
Advantages of the Consolidated API Key
- By merging three functionalities into one API key, Complyance significantly reduces complexity, making the e-invoicing process more streamlined and user-friendly.
- The unified API key comes with robust security measures, safeguarding sensitive data and transactions.
- The consolidation allows for easier integration with existing systems, reducing the technical burden on businesses.
- Alongside the unified API key, you'll find detailed documentation for easy implementation and usage.
Why Choose Complyance's Unified API for ZATCA E-Invoicing?
- Expert Development: Our team comprises experts in ZATCA e-invoicing, ensuring a high-quality, reliable API solution.
- Adaptability for Future Needs: Designed with the future in mind, our API is equipped to adapt to changes in tax compliance and business requirements.
- Unparalleled Customer Support: Complyance is dedicated to supporting businesses in leveraging the full potential of the unified API key.
Getting Started with Complyance's API V2:
Before diving into the API calls, it's essential to understand the foundation. Complyance's API is designed around the REST architecture, accepting JSON-encoded body requests and returning data in the same format. To begin, users need to register with Complyance and create an account. Once registered, they can utilize the API's features completely.
Complyance.io’s APIs for ZATCA E-Invoicing
This document is your go-to resource for comprehending and implementing our APIs seamlessly. Specifically tailored for both developers and Complyance users, these APIs unlock the full potential of your Complyance account's ZATCA features.
Here's what you'll find in this document:
- API Overview: We've compiled a list of all our APIs, detailing their essential parameters and providing example requests and responses for your convenience.
- Getting Started: The easiest way to dive into Complyance's APIs is to click the "Run in Postman - ask post collection with our team " button above. Postman, a free developer tool, simplifies the process of running and debugging API requests.
- Technical Insight: Our APIs adhere to REST architecture and employ standard HTTP request methods. They accept JSON-encoded body requests and return data in the same format.
Ready to get started? Explore the sections below to streamline your integration with Complyance's ZATCA E-Invoicing APIs.
Begin Your Integration Journey with Complyance's API:
Finally, explore this guide to integrate your systems effortlessly with Complyance's ZATCA E-Invoicing APIs. Whether you need detailed technical info or just want to make the most of the ZATCA features in your account, this guide has you covered.
Understanding API Workflows in Complyance's E-Invoicing System:
API workflows in Complyance's system are essentially a set of pre-arranged sequences involving various API calls and actions. These workflows are designed to automate particular processes or tasks within an application or system. Specifically, in the realm of E-Invoicing, there are noteworthy workflows to consider:
B2C Tax Document Workflow:
The B2C Tax Document Workflow is tailored for Business-to-Consumer (B2C) transactions involving tax documents. It consists of a structured sequence of API calls and steps designed to efficiently manage tax-related documents in scenarios where businesses interact directly with individual consumers. This workflow is essential for facilitating smooth and compliant transactions in a B2C context.

B2B Tax Document Workflow:
This workflow, known as the B2B Tax Document Flow, is specifically designed for Business-to-Business interactions involving tax documents. It clearly details the sequence of API calls required to effectively handle tax documentation in scenarios where businesses transact with other businesses.
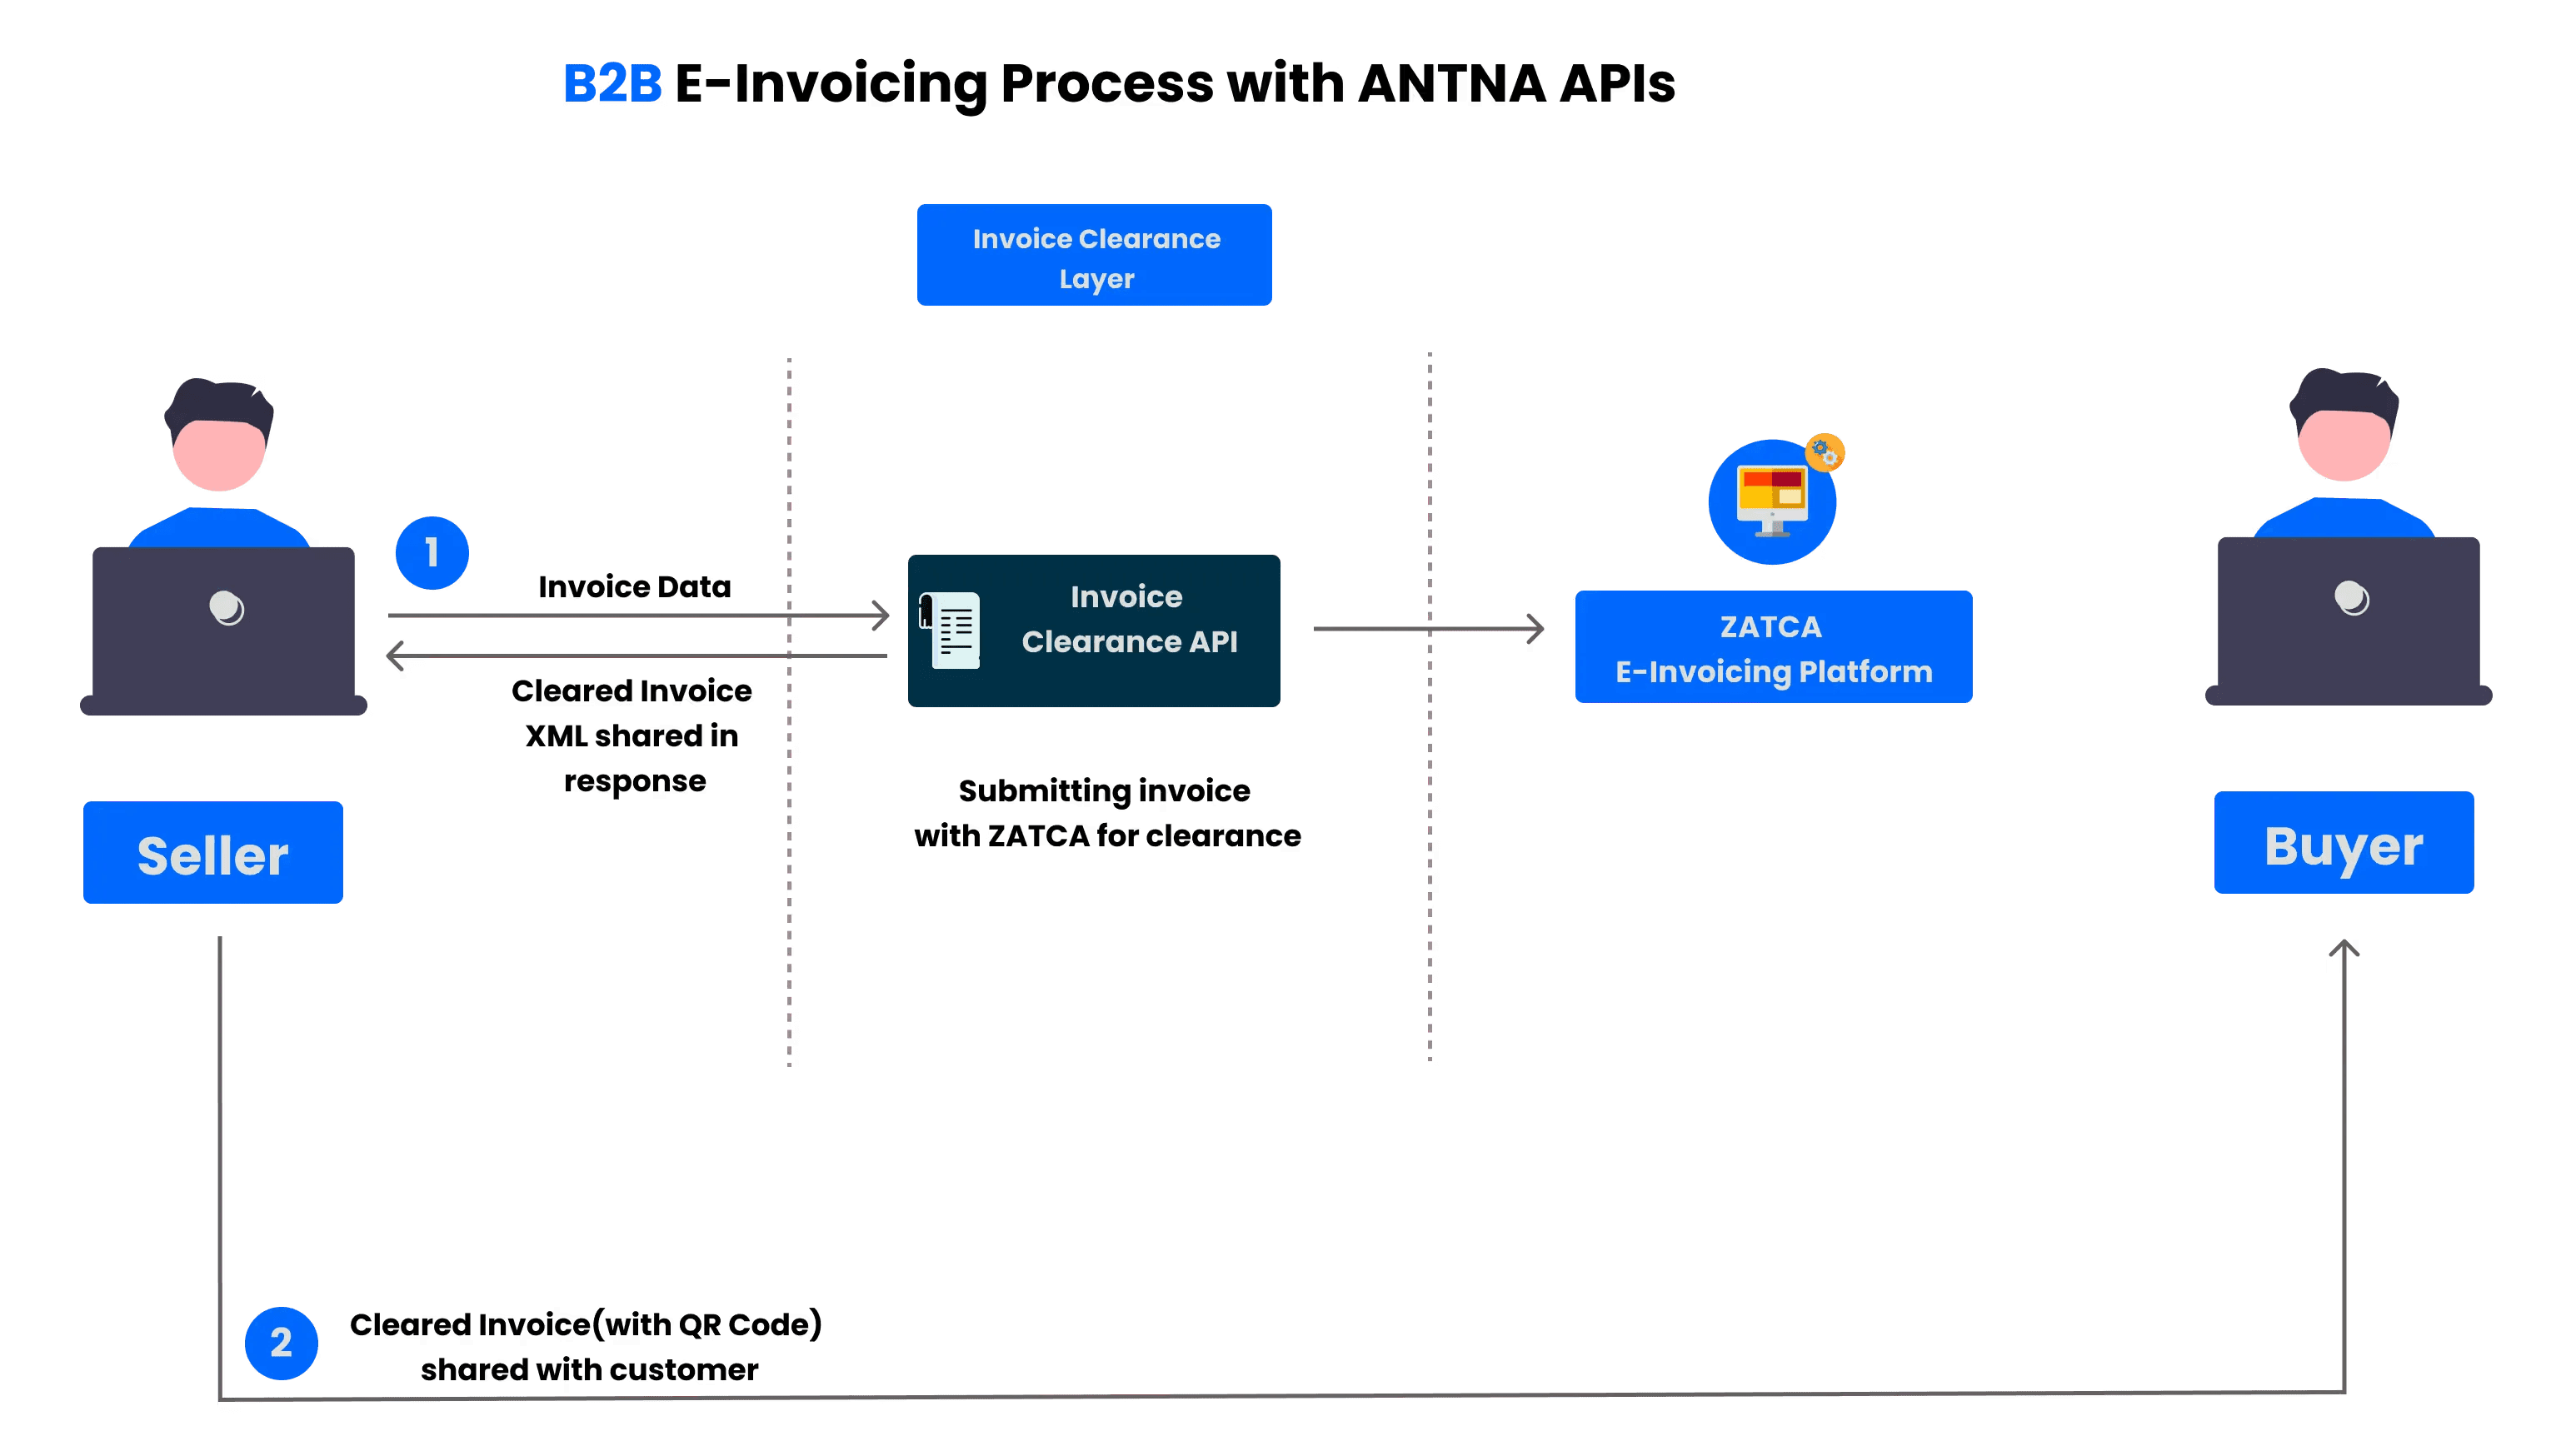
Each of these workflows, whether for B2C or B2B transactions, includes a series of API endpoints. They're like checkpoints, each with specific roles in handling data and managing tax documents. In addition, these workflows might involve steps for authentication and authorization, ensuring secure and authorized access.
Firstly, in the B2C workflow, the focus is on transactions between businesses and individual consumers. Here, the sequence of API calls is organized to handle tax documents in a way that's straightforward and compliant with consumer transactions.
On the other hand, the B2B workflow deals with business-to-business interactions. This setup involves a different set of API endpoints geared towards managing tax documents between companies.
Both workflows act as practical guides for developers and system integrators. They provide a clear roadmap, showing which API calls to make and in what order, to handle tax documents correctly in their respective contexts. This approach ensures that the desired results are achieved efficiently when managing tax-related processes.
Getting Started with Testing ZATCA APIs:
Preparing for API Testing:
Before you dive into API testing, make sure you have the right tools and accounts. Here’s a guide to get you started with Postman:
- Installing Postman: If you don't have Postman yet, download and install it from the Postman website.
- To get started with Postman, visit their website at https://www.postman.com/downloads/.
- On the page, you'll find options for different versions. Choose the one suitable for your computer, download it, and then follow the instructions to install it.
- Creating a Postman Account: Open Postman, click on "Sign In / Sign Up" at the top right, and choose "Sign Up for Free" to create your account.
- Email Verification: Postman will send you an email to verify your address. Click the link in this email to activate your account.
- Logging Into Postman: Once your email is verified, log back into Postman with your new account details.
- Setting Up Postman for Testing: Now, Postman is ready for you to start setting up and running your API tests.
By following these steps, you'll be well-prepared to effectively use and test the ZATCA Integration APIs using Postman.
Getting Started with Complyance's APIs:
To begin exploring Complyance's APIs, simply click this link. It will take you directly to the Postman API where you can access and fork the collection for your use. This step is the quickest way to dive into our APIs and start working with them in Postman.
After clicking the link, simply select "fork collection." This action will provide you with access to our Complyance API Docs, simplifying the integration process with Zatca APIs and enabling you to begin your testing and development effortlessly.

Following these steps will set you up for API testing in Postman. Remember to look at the specific API documentation you're testing to get a clear idea of the endpoints, what you need for authentication, and what responses to expect.
If you need more information? Just click View complete documentation.You'll be guided to our detailed API documentation for an in-depth understanding.
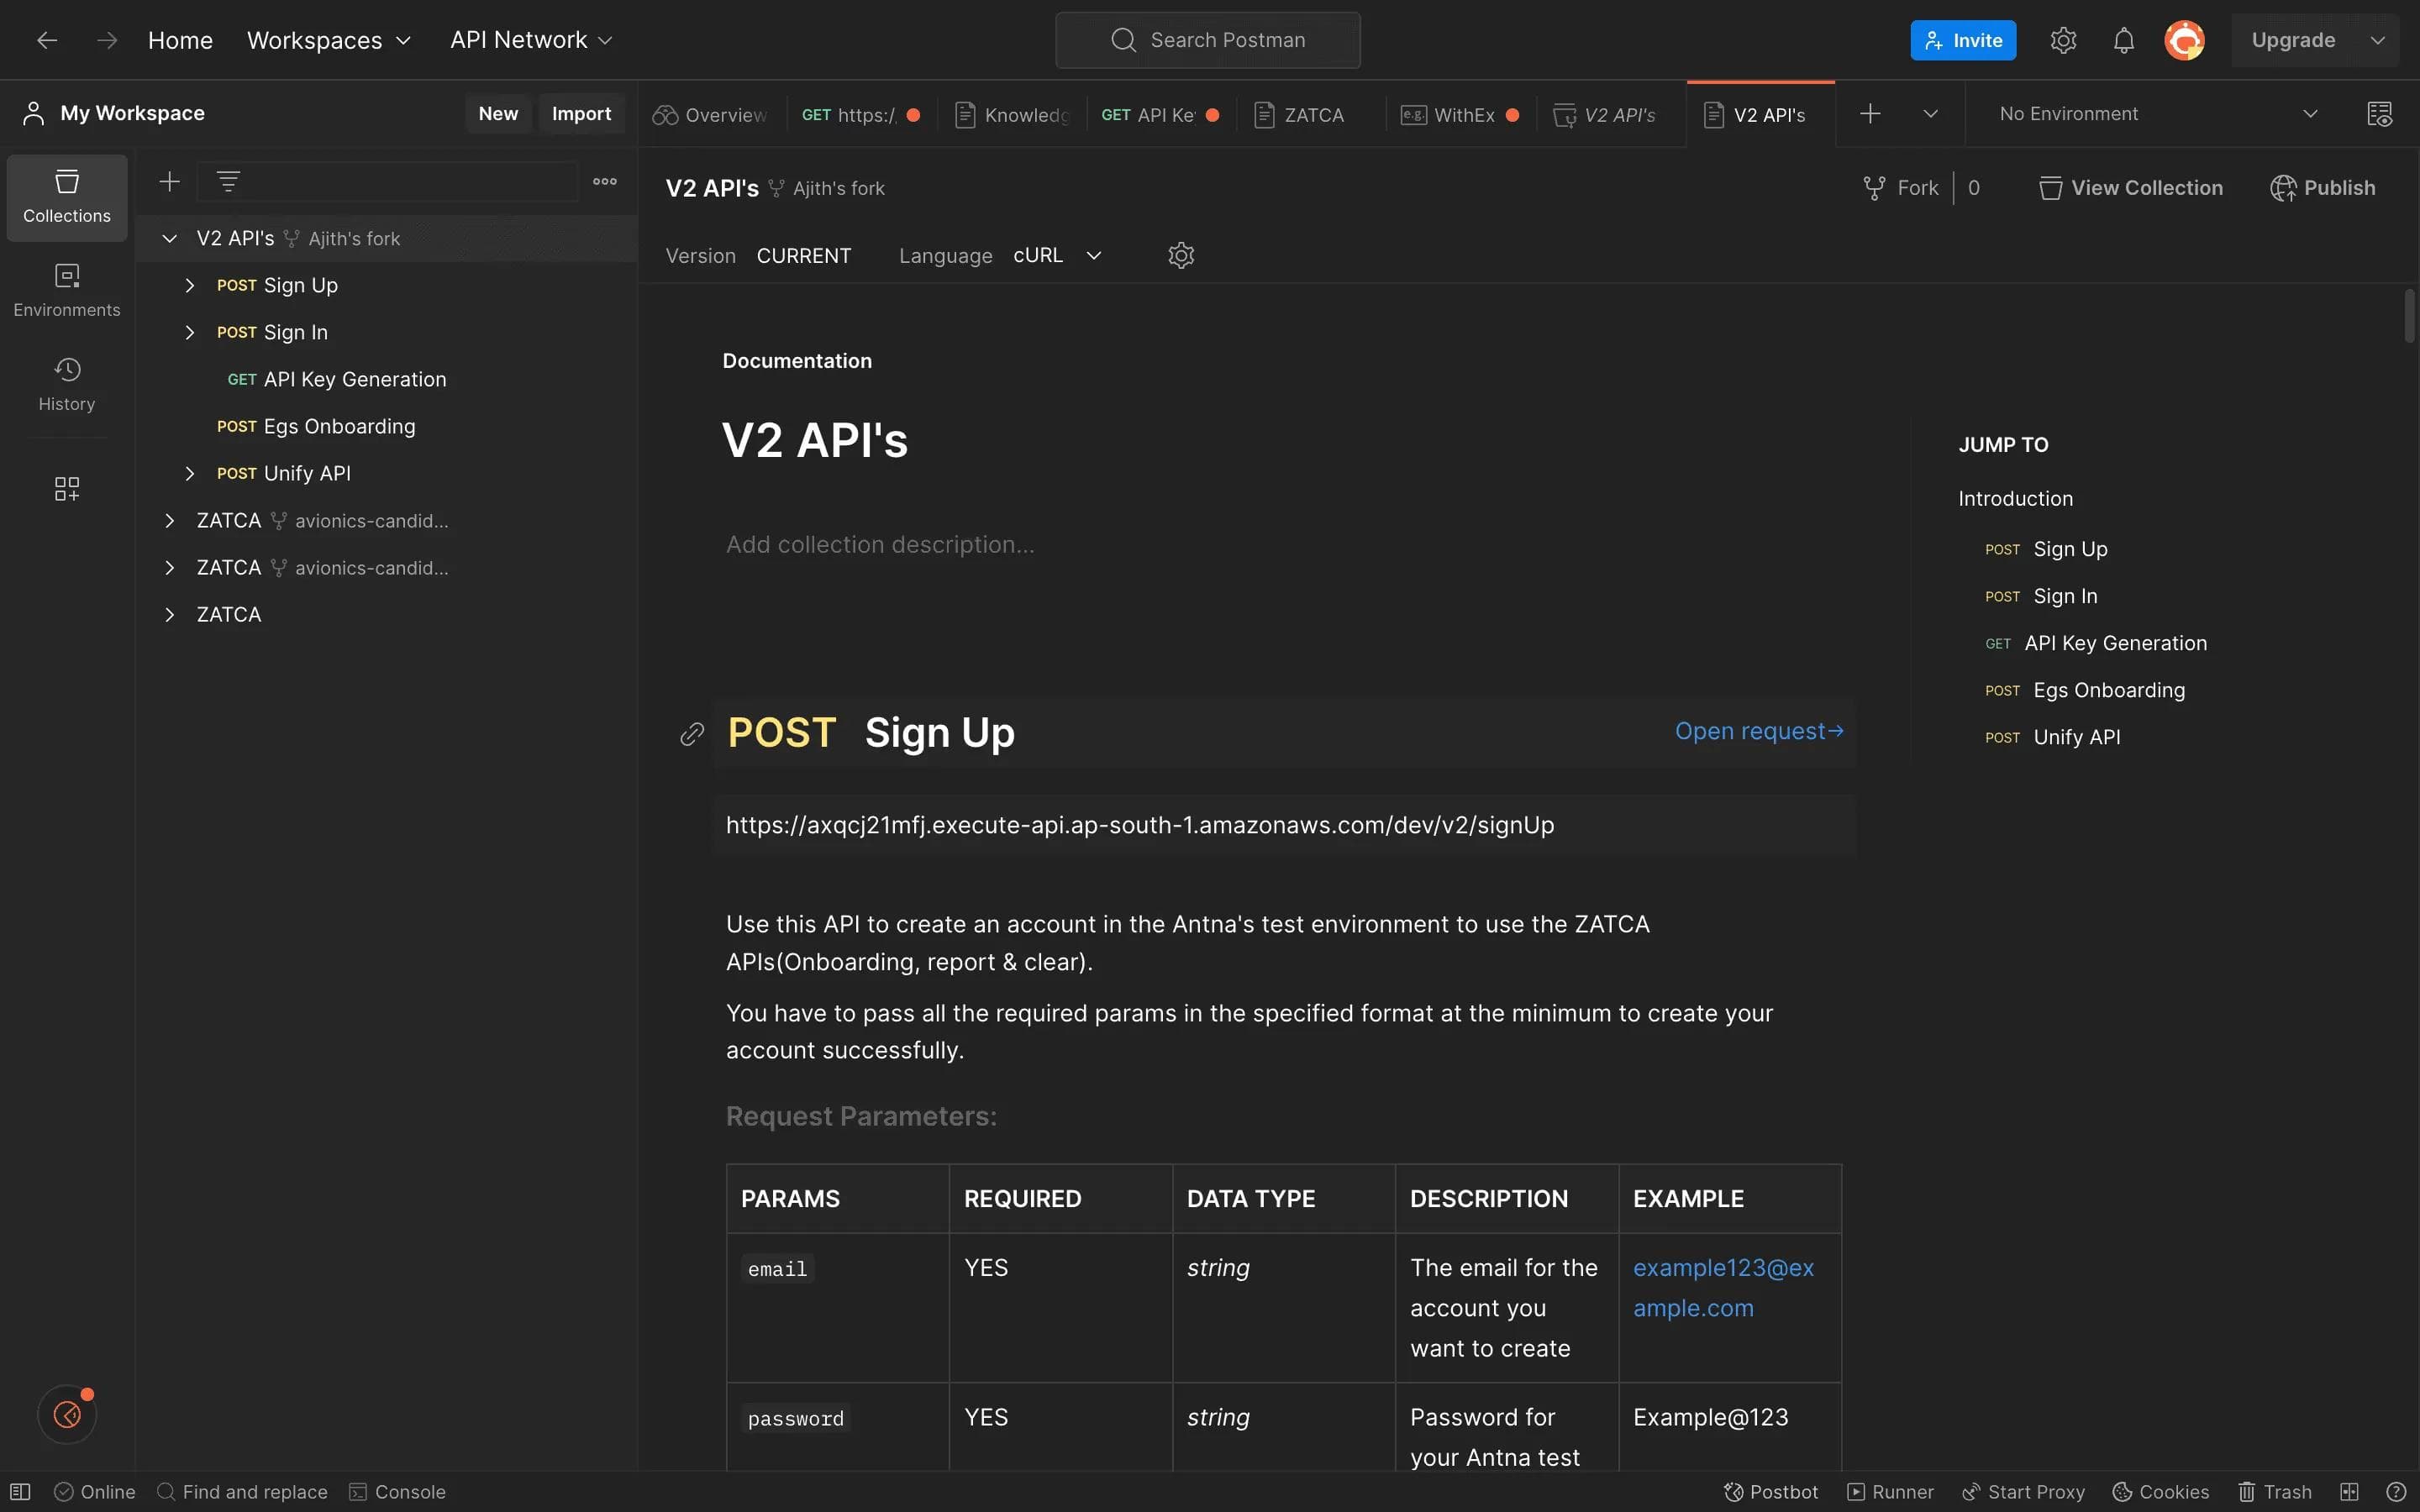
The Initial Step: Account Sign Up
API Function: Account Creation for Testing
- Objective: This API is your gateway to create a test account within Complyance’s system. It's a crucial step to access ZATCA's suite of APIs for tasks like onboarding, report generation, and transaction clearing.
Key Inputs You Need to Provide:
- Email (Mandatory): Your unique email address for setting up the account. It should be in a standard format, like example123@example.com.
- Password (Mandatory): A strong, secure password for accessing your Complyance test account. Ensure it's robust by including an uppercase letter, a special character, and a numeral (Example: Example@123).
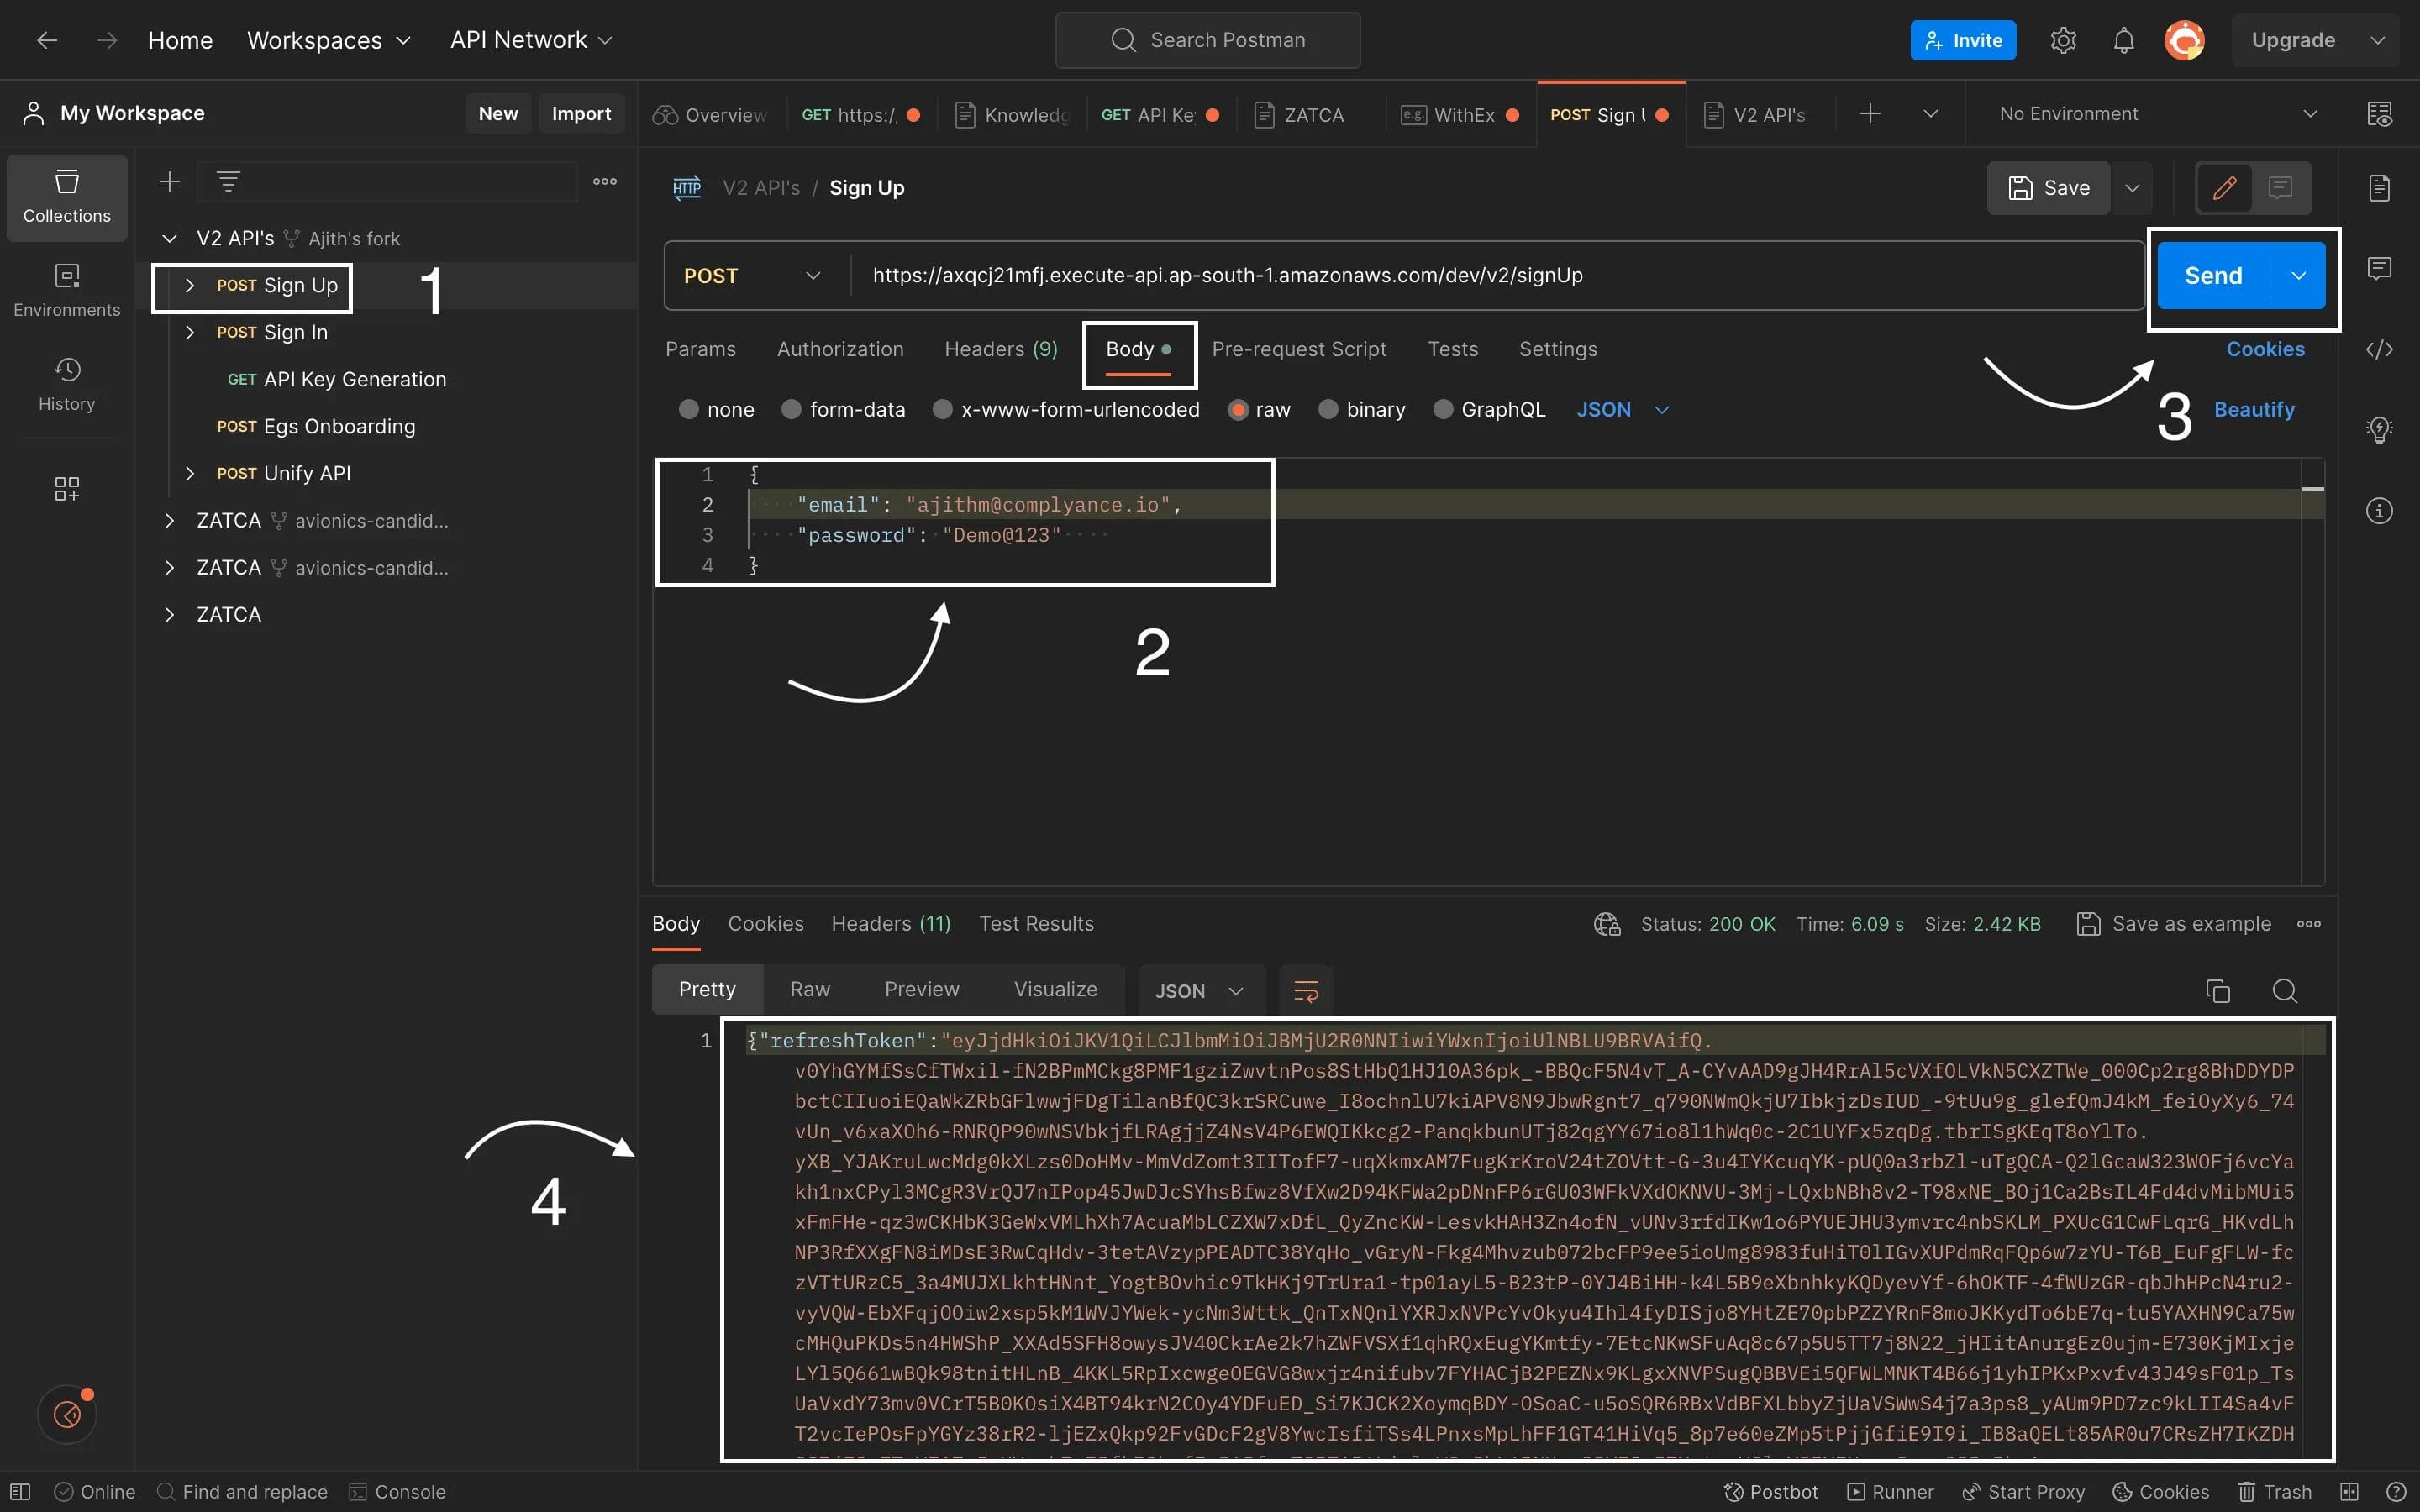
Once you've entered the required information, typically your email and password, double-check for accuracy.
Now, it's time to proceed by clicking the "Send" button within Postman. This action will trigger the API request, and Postman will handle sending it to the specified API endpoint. You can monitor the progress right in the interface.
Once the request reaches the server, Postman will patiently await the response. When the server responds, Postman will promptly display it.
Within the response, you may find valuable data, including a "refreshToken." This token is often essential for maintaining authentication and managing sessions with the API. Ensure you store this token securely for future use.
Outputs You Will Receive:
- refreshToken: This token is vital and remains valid for an entire year. It's used to securely acquire a temporary accessToken, which needs to be renewed every 24 hours. Store this token safely for ongoing access.
Sample Request:
Response Sample:
Carefully go through the response to ensure your API request was successful. Keep an eye out for the status code, which is often 200 OK for success, and confirm that the refreshToken and other expected data are present.
Sign In
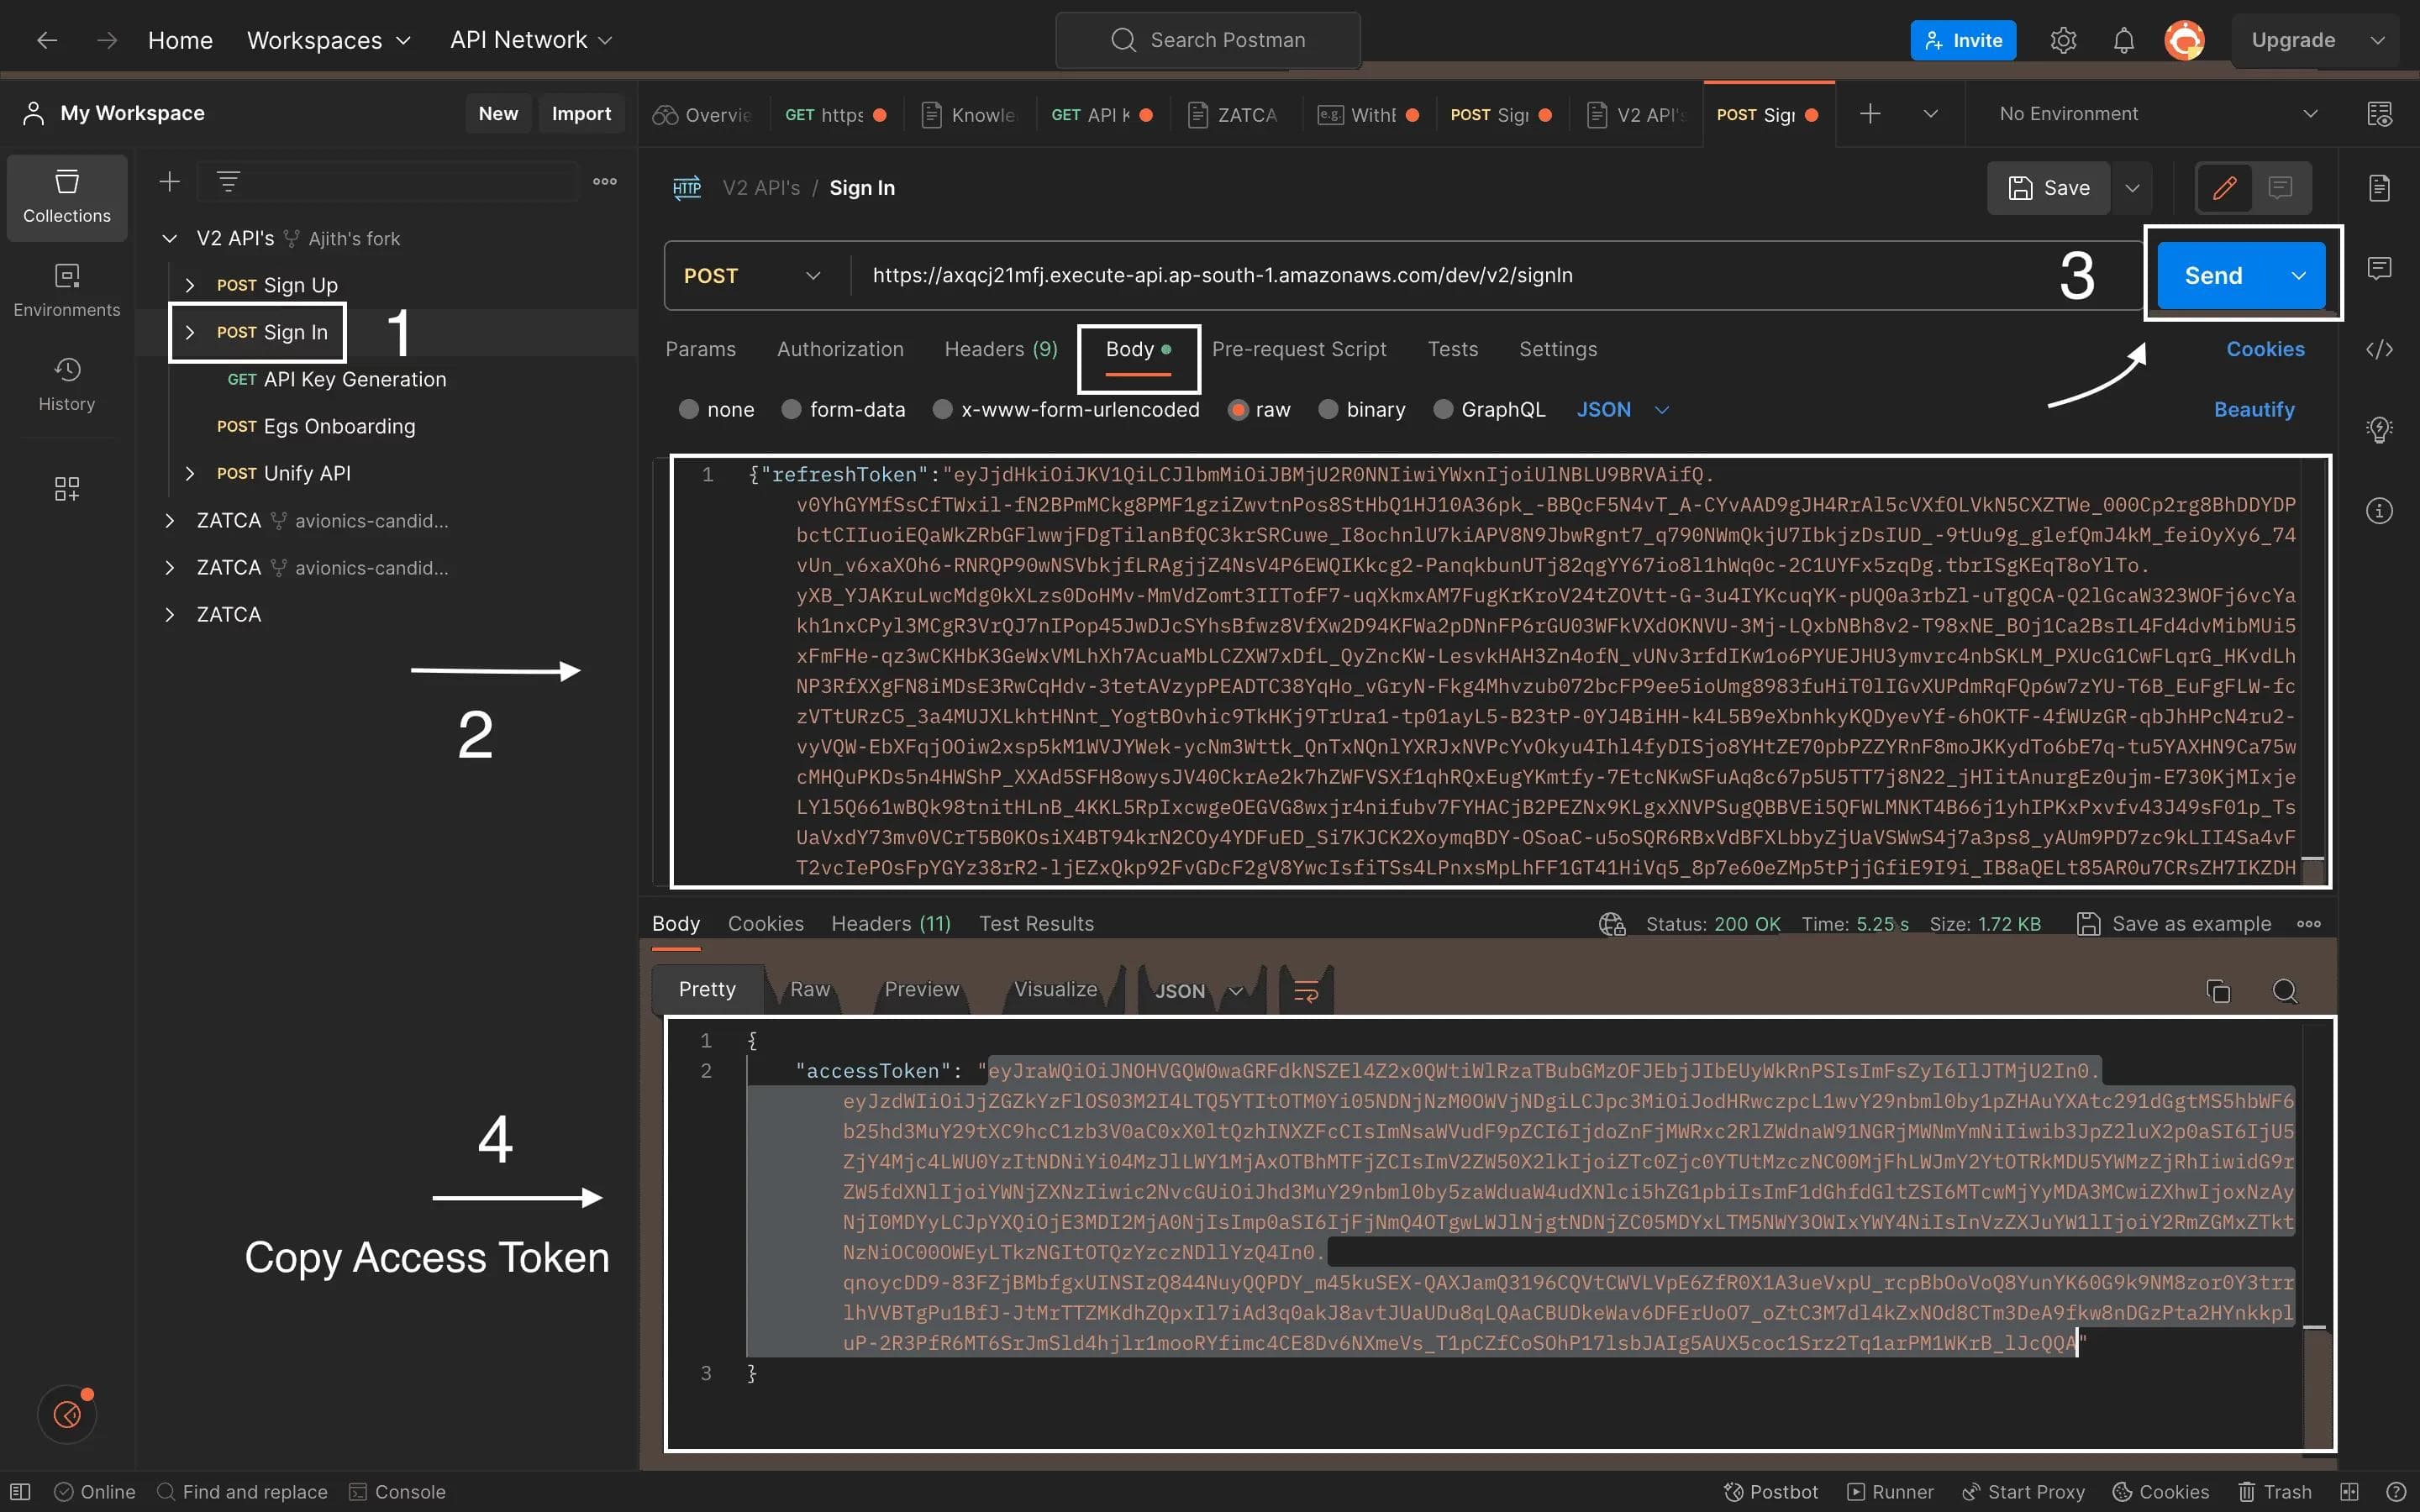
After successfully completing the signup process and obtaining your refreshToken, the next step is to proceed with the Sign In process.
To initiate the sign-in API request, launch a new request in Postman, making sure to select the appropriate HTTP method, typically "POST" for sign-in operations.
Compose the request body by including essential information, such as your email and password, along with the refreshToken acquired earlier. This refreshToken acts as a key to maintain your authenticated session.
Simply copy the refreshToken and paste it into the "Sign In" section of the request body.
After entering the required data, double-check its accuracy and ensure everything is set for submission.
Execute the API request by clicking the "Send" button in Postman. Just like before, Postman will securely handle the request, sending it to the designated API endpoint.
Request Sample:
Response Sample:
This API enables you to sign in to your Complyance account and receive an access token, granting access to other Complyance APIs. You'll need to provide your refresh token to obtain the access token, which remains valid for one day.
Be sure to carefully inspect the response to verify the success of your API request. Check for the status code, which is typically "200 OK" in the case of a successful sign-in.
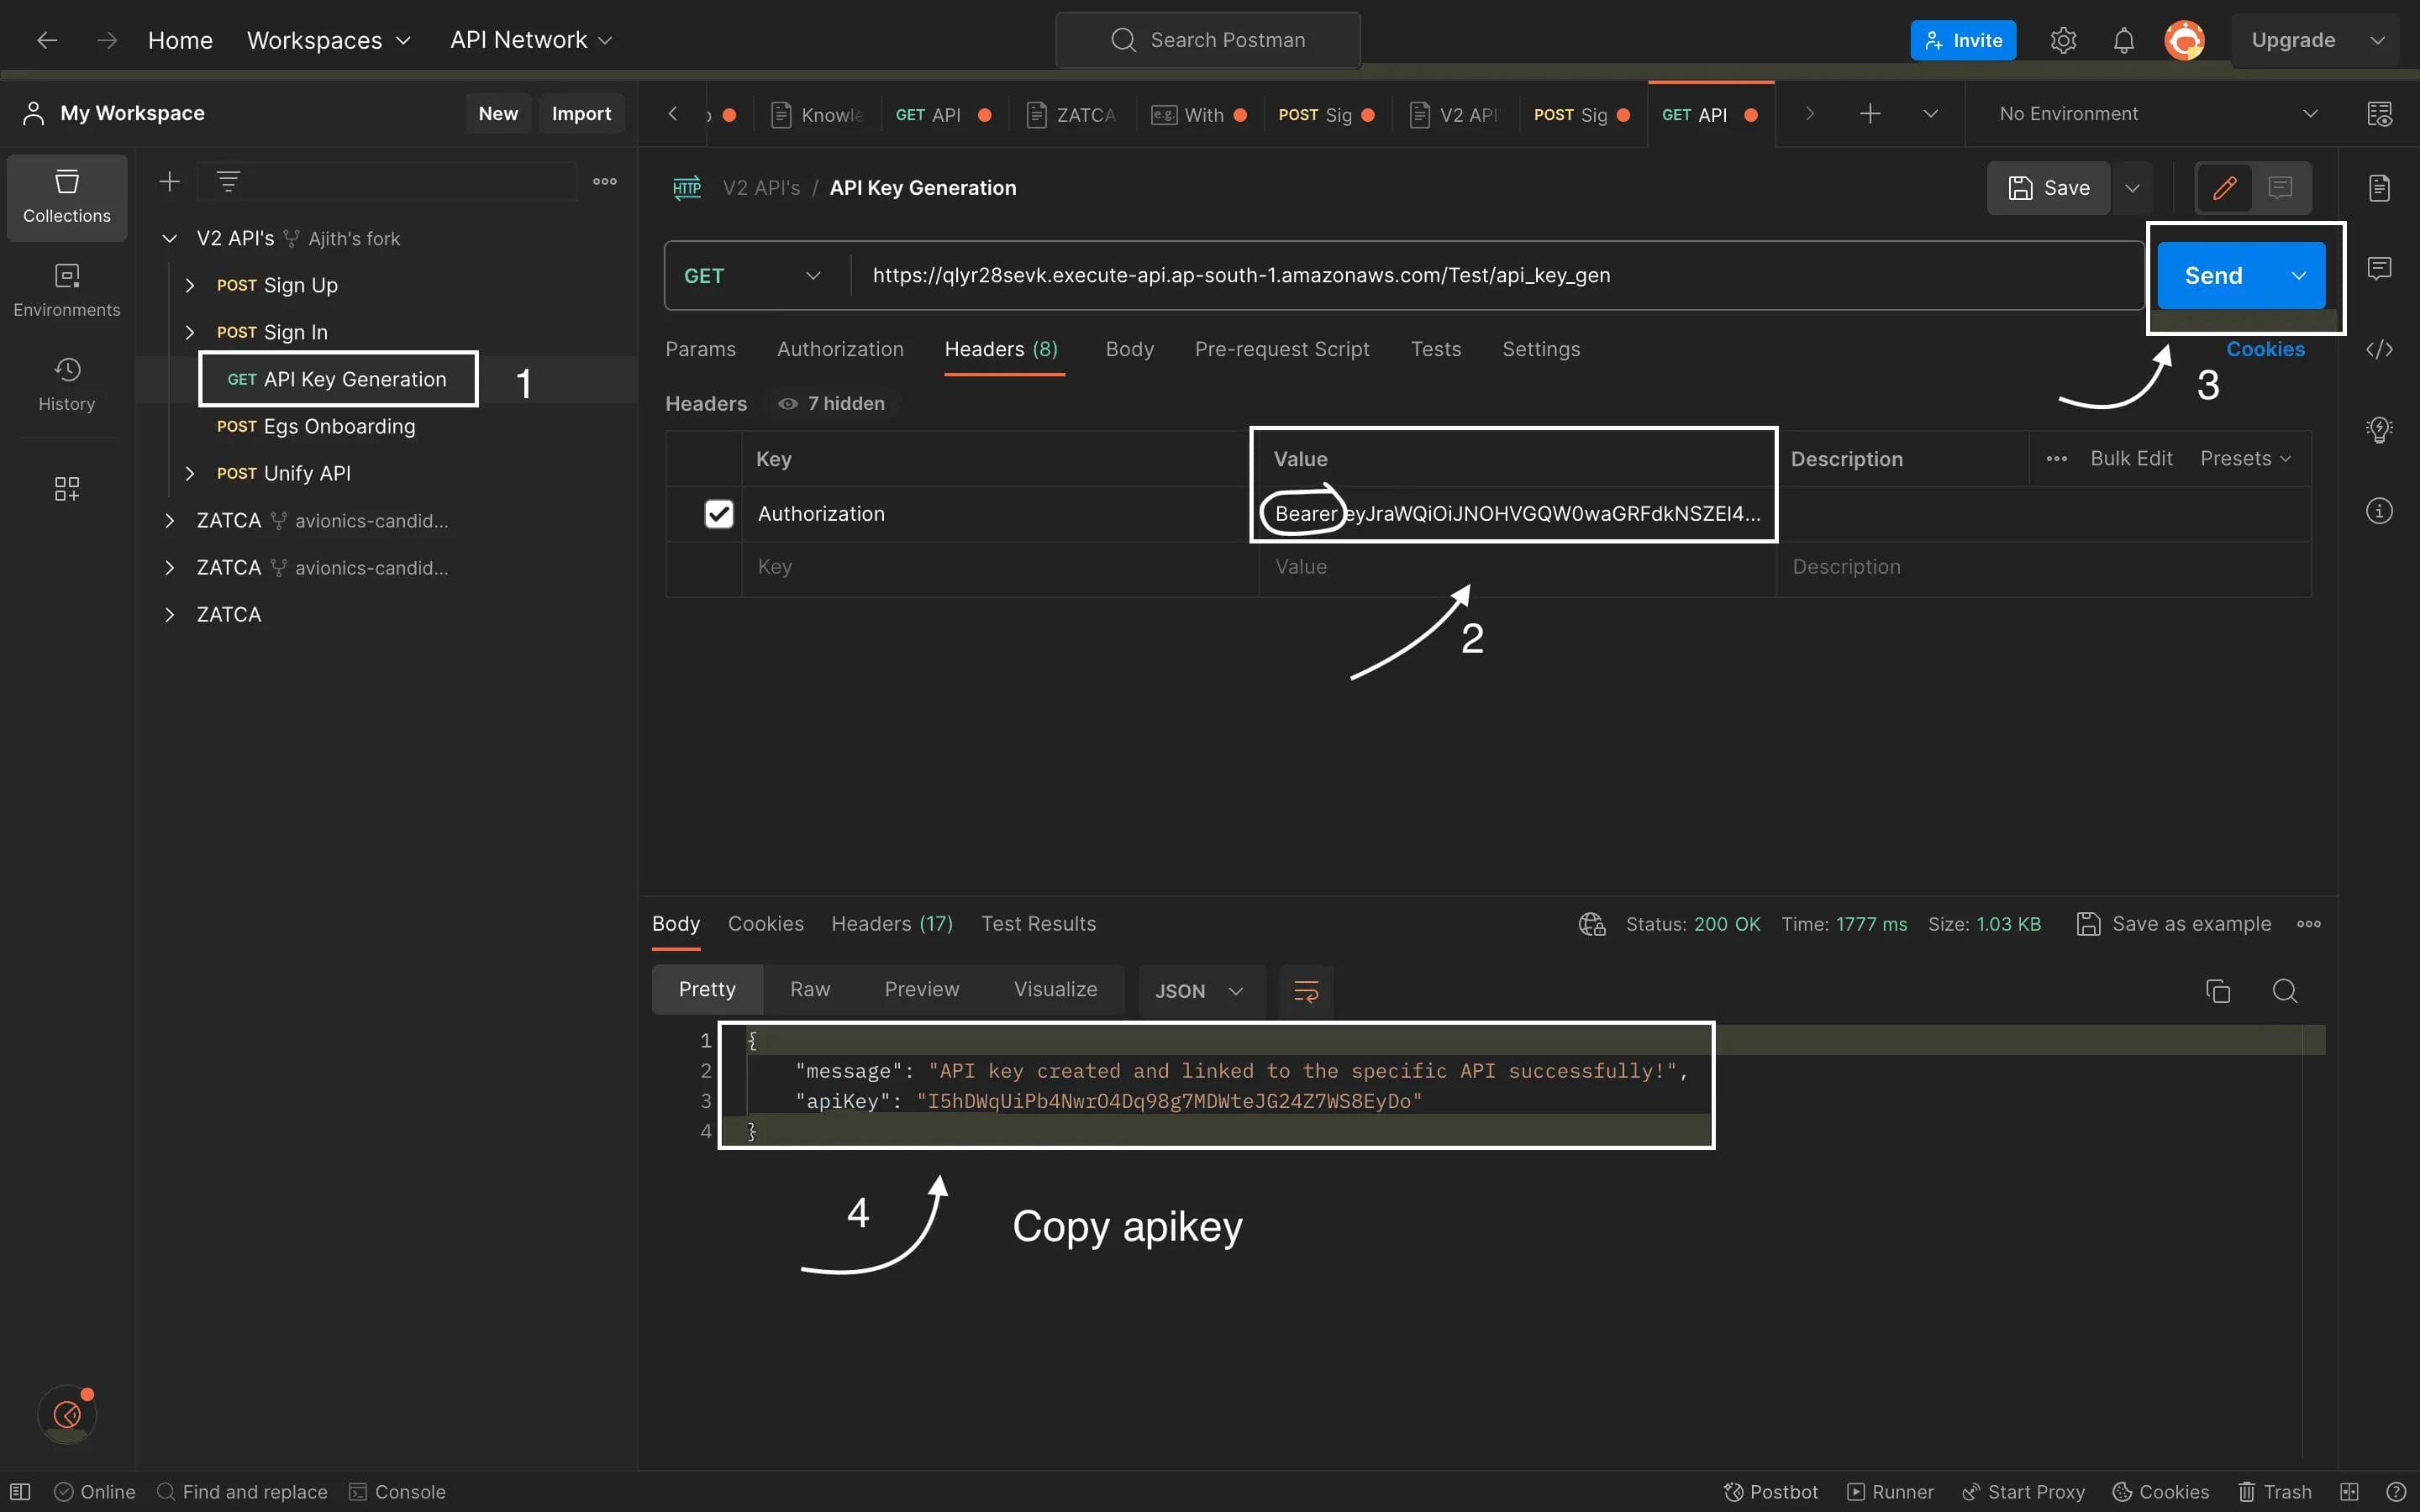
Creating API Key Post Sign-In:
Following a successful sign-in, the next step is generating your API key. Head to the API key generation endpoint, switch to "Headers tab" and paste the access token after "Bearer" in the value column, and click send, and you'll receive your "API key," which remains active for one year.
Onboarding API:
After successfully signing up, signing in, and generating a unique API Key, the next significant step is securing the API Key, which marks the beginning of the onboarding phase. The Onboarding API acts as the bridge for integrating your E-Invoice Generation Solution (EGS) into the ZATCA sandbox environment. Make sure to input the required parameters in the specified format, and you have the flexibility to include additional parameters to align with your specific needs.
For a more thorough understanding, I am prepared to offer a comprehensive explanation of the Onboarding API, complemented by JSON data samples.
Key Steps:
- Initiate Onboarding: Utilize the Onboarding API to seamlessly integrate your EGS within the ZATCA sandbox environment.
- Parameter Requirements: Ensure the inclusion of all essential parameters in the specified format to achieve a successful onboarding process. Additional parameters can be introduced based on your preferences.
Integrating Your API Key: To seamlessly integrate your E-Invoice Generation Solution (EGS), follow these steps:
- Copy the API Key you received.
- Go to the EGS onboarding File and select "Header tab"
- Locate the "x-api-key" value and paste your API Key into the current Token field.
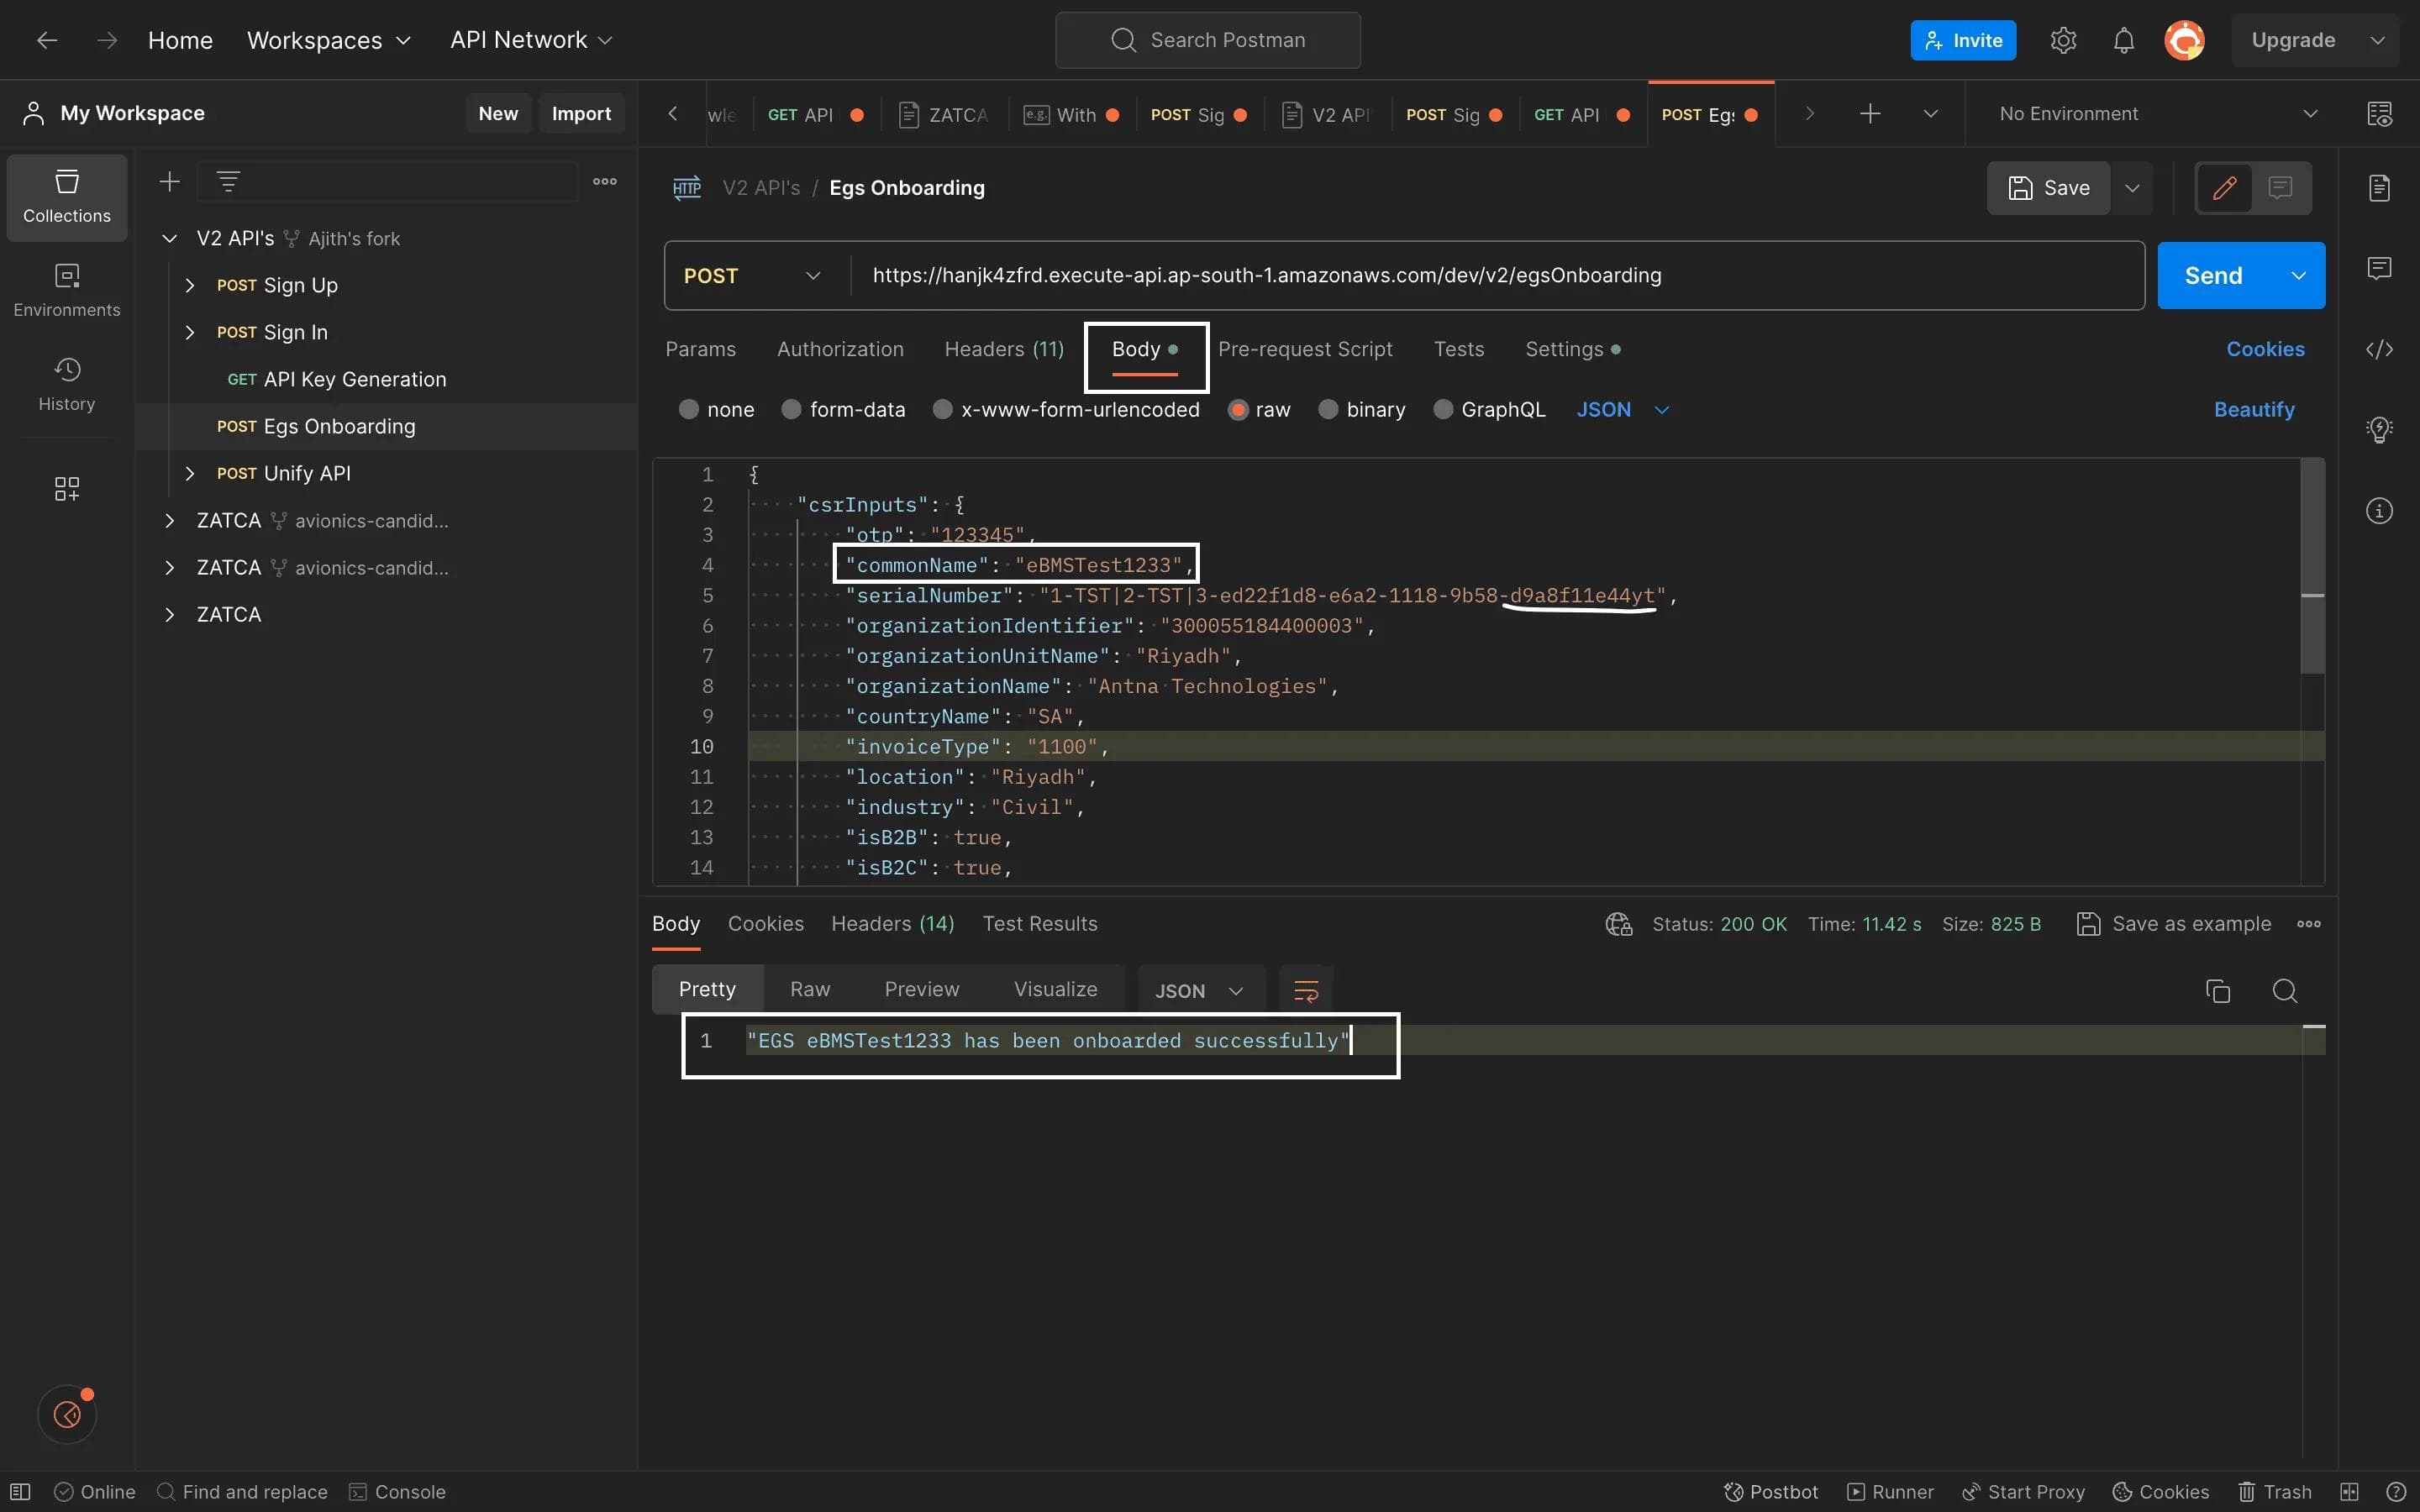
Once you send the request, you'll receive the following confirmation message: "For example EGS eBMSTest1234 has been successfully onboarded.”
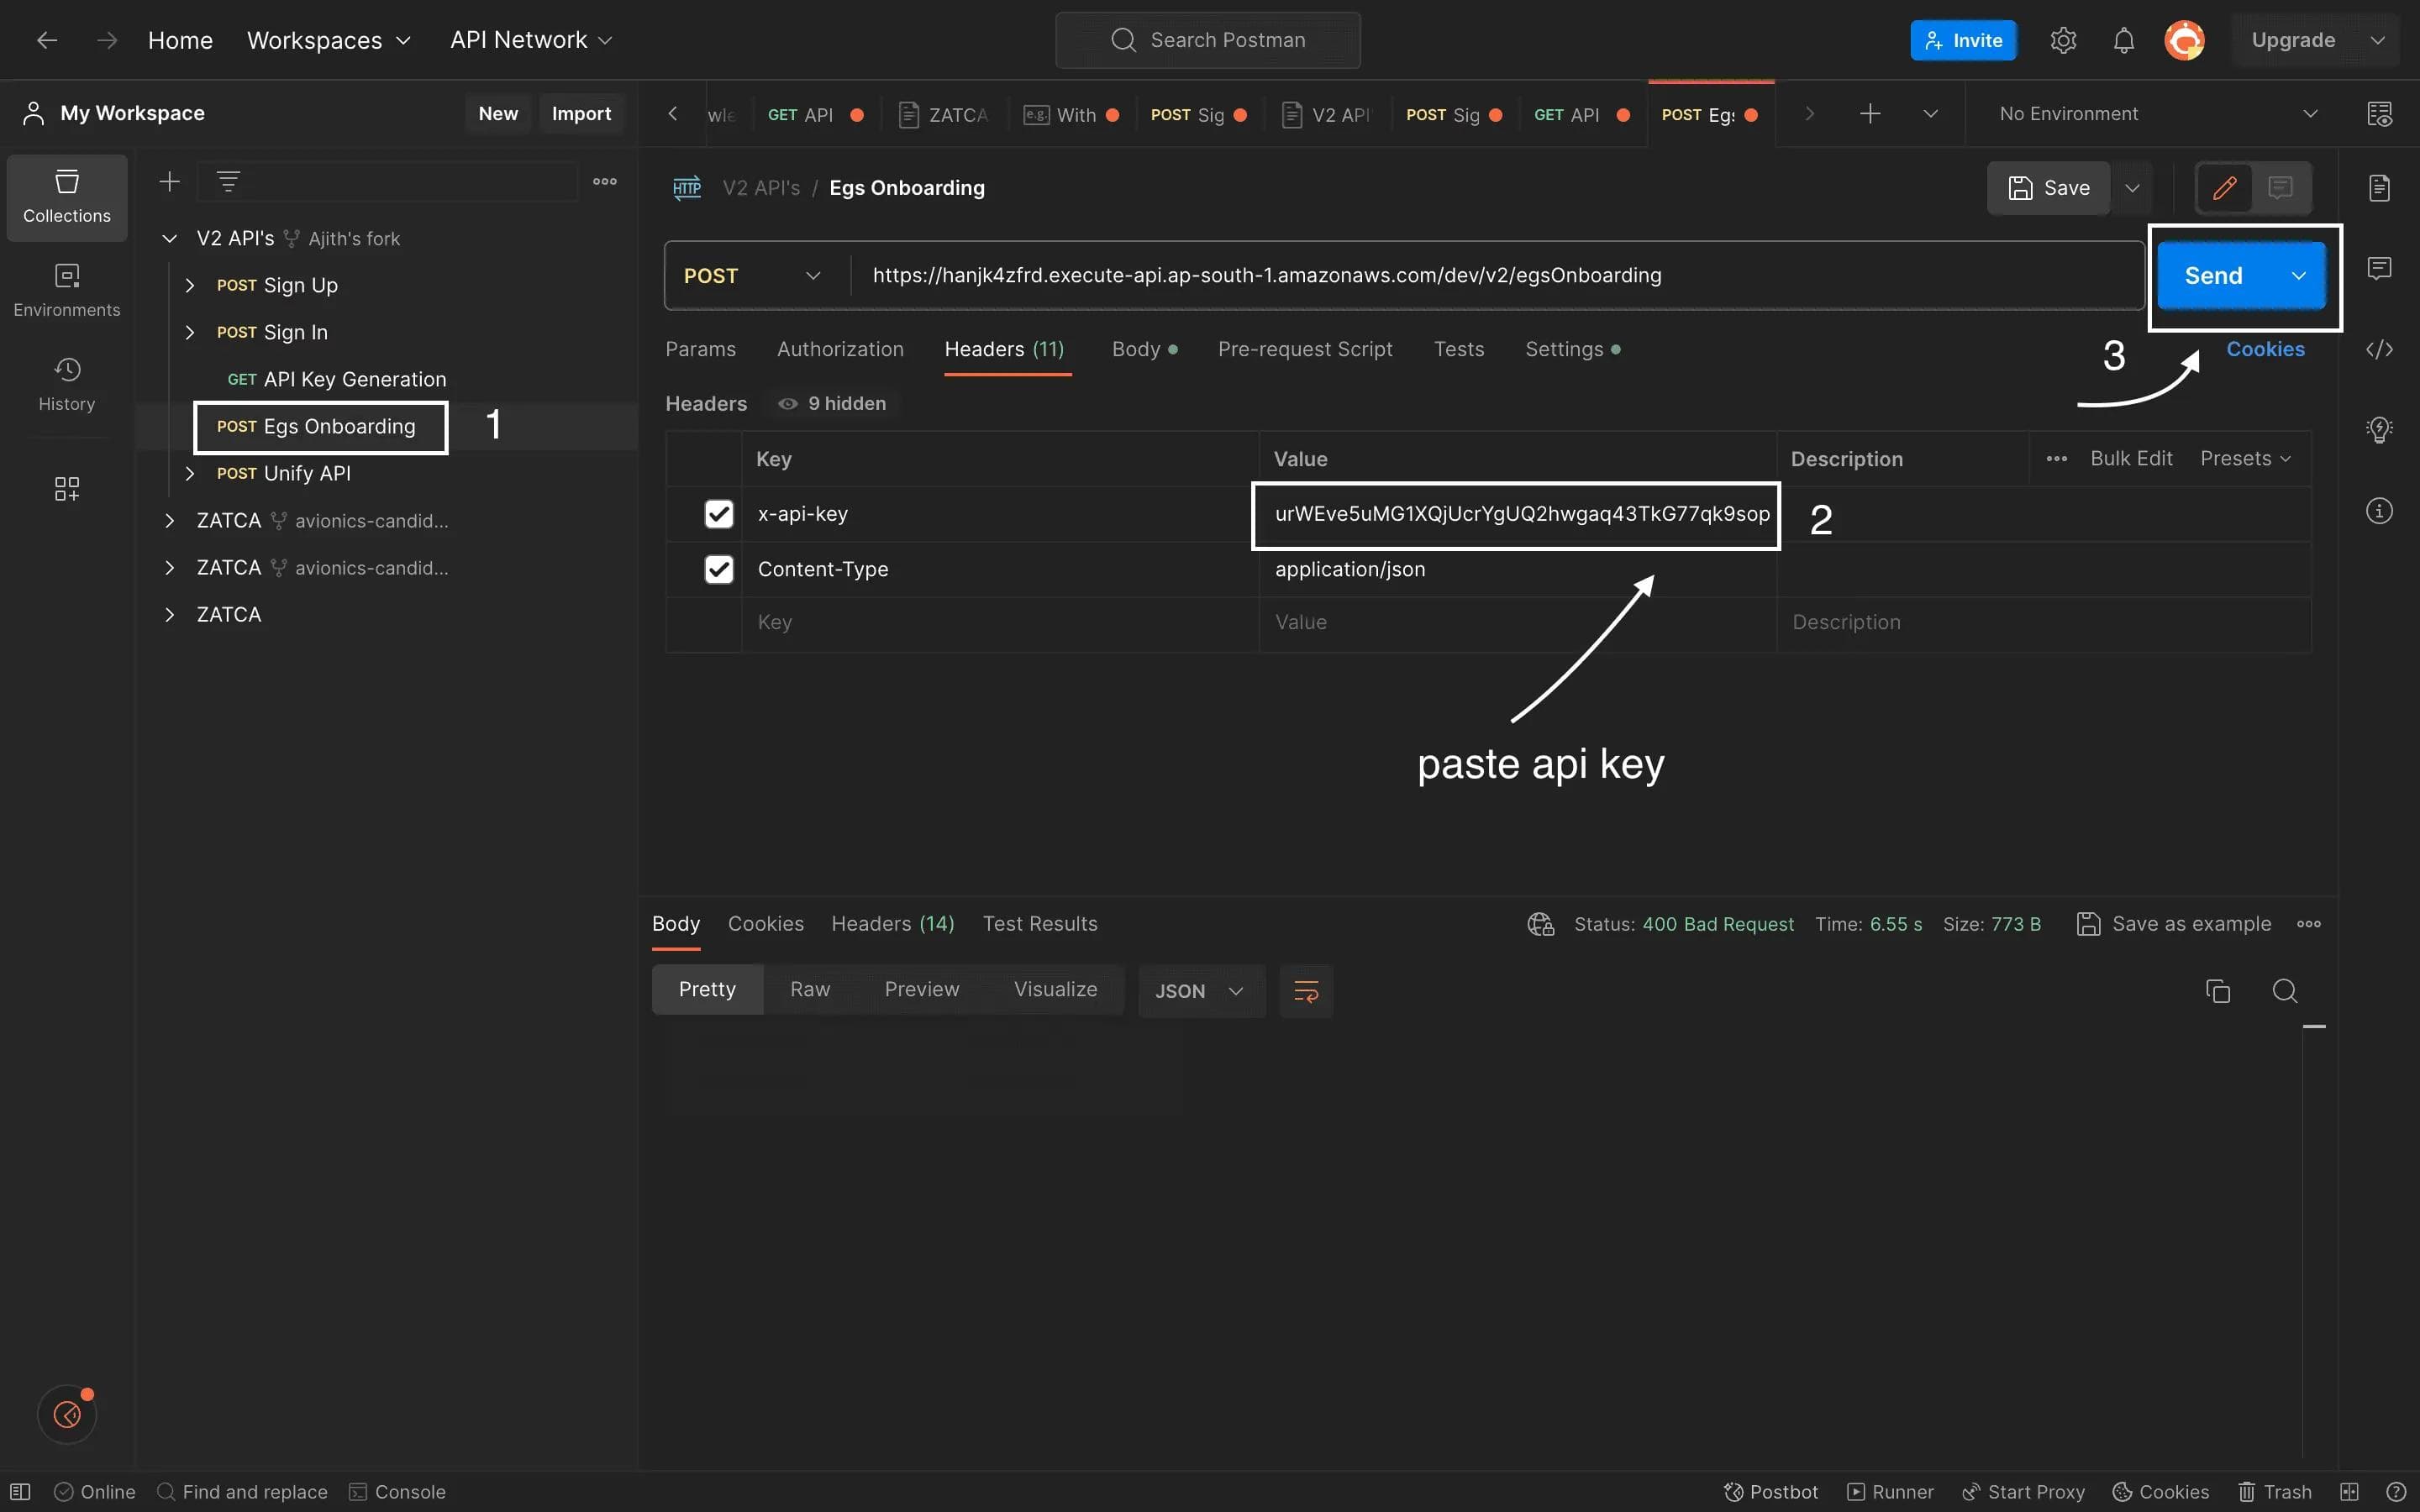
Feel free to customize the common name and serial number as per your preferences. For testing purposes, you can modify the last 5 digits or characters. You have the flexibility to change any part of the data to suit your needs.
Request Sample:
csrInputs: This is the main object containing all the CSR-related data.
- OTP: This field holds an OTP (One-Time Password) value, which is typically used for authentication purposes.
- commonName: It represents a common name or identifier, in this case, "eBMSTest1233."
- serialNumber: This field seems to contain a unique identifier, possibly related to the certificate being requested.
- organizationIdentifier: This is an identifier for the organization, which appears to be "300055184400003."
- organizationUnitName: It specifies the organizational unit within the organization, identified as "Riyadh."
- organizationName: This field holds the name of the organization, which is "Antna Technologies."
- countryName: It represents the country code, "SA," indicating Saudi Arabia.
- invoiceType: This is related to invoice types, with the value "1100."
- location: It specifies the location, identified as "Riyadh."
- industry: This field indicates the industry, marked as "Civil."
- isB2B: A boolean value indicating whether the organization engages in Business-to-Business (B2B) transactions (true in this case).
- isB2C: A boolean value indicating whether the organization engages in Business-to-Consumer (B2C) transactions (true in this case).
Here are real-time examples for B2B and B2C requirements:
B2B Requirements:
- isSelfBilling: This indicates whether the organization practices self-billing. For example, if a manufacturing company creates invoices for its distributors and customers, it would set this to true. In this case, the organization generates invoices on behalf of its clients.
- isThirdParty: This field represents whether third parties are involved in B2B transactions. For instance, if a logistics company handles invoice generation on behalf of multiple businesses, it would set this to true. In this scenario, third-party service providers are responsible for creating invoices.
- isSummaryPresent: This reflects whether a summary is present in B2B transactions. For example, in the financial sector, banks often provide monthly statements summarizing all transactions conducted during that period. Setting this to true indicates that such summaries are included in B2B transactions.
- isExport: If an organization is involved in international trade and exports goods to other countries, it would set this to true. Export-oriented businesses generate specific export invoices to comply with customs and trade regulations.
- isNominal: This field signifies whether nominal values are used in B2B transactions. For instance, a software company may issue nominal invoices for software licenses or subscriptions, where the amounts are standardized.
B2C Requirements:
- isThirdParty: In B2C transactions, third parties can be involved in various ways. For instance, in e-commerce, third-party payment gateways like PayPal or Stripe handle payment processing. Setting this to true indicates that such third-party services are part of B2C transactions.
- isSummaryPresent: In certain B2C scenarios, such as utility billing, summary bills may not be provided to individual consumers. Instead, consumers receive detailed invoices for their usage. Setting this to false suggests that individualized invoices are issued in B2C transactions.
- isNominal: Similar to B2B, this field indicates whether nominal values are used in B2C transactions. For instance, a streaming service may charge a nominal monthly subscription fee to its individual customers.
Response Sample:
Unify API
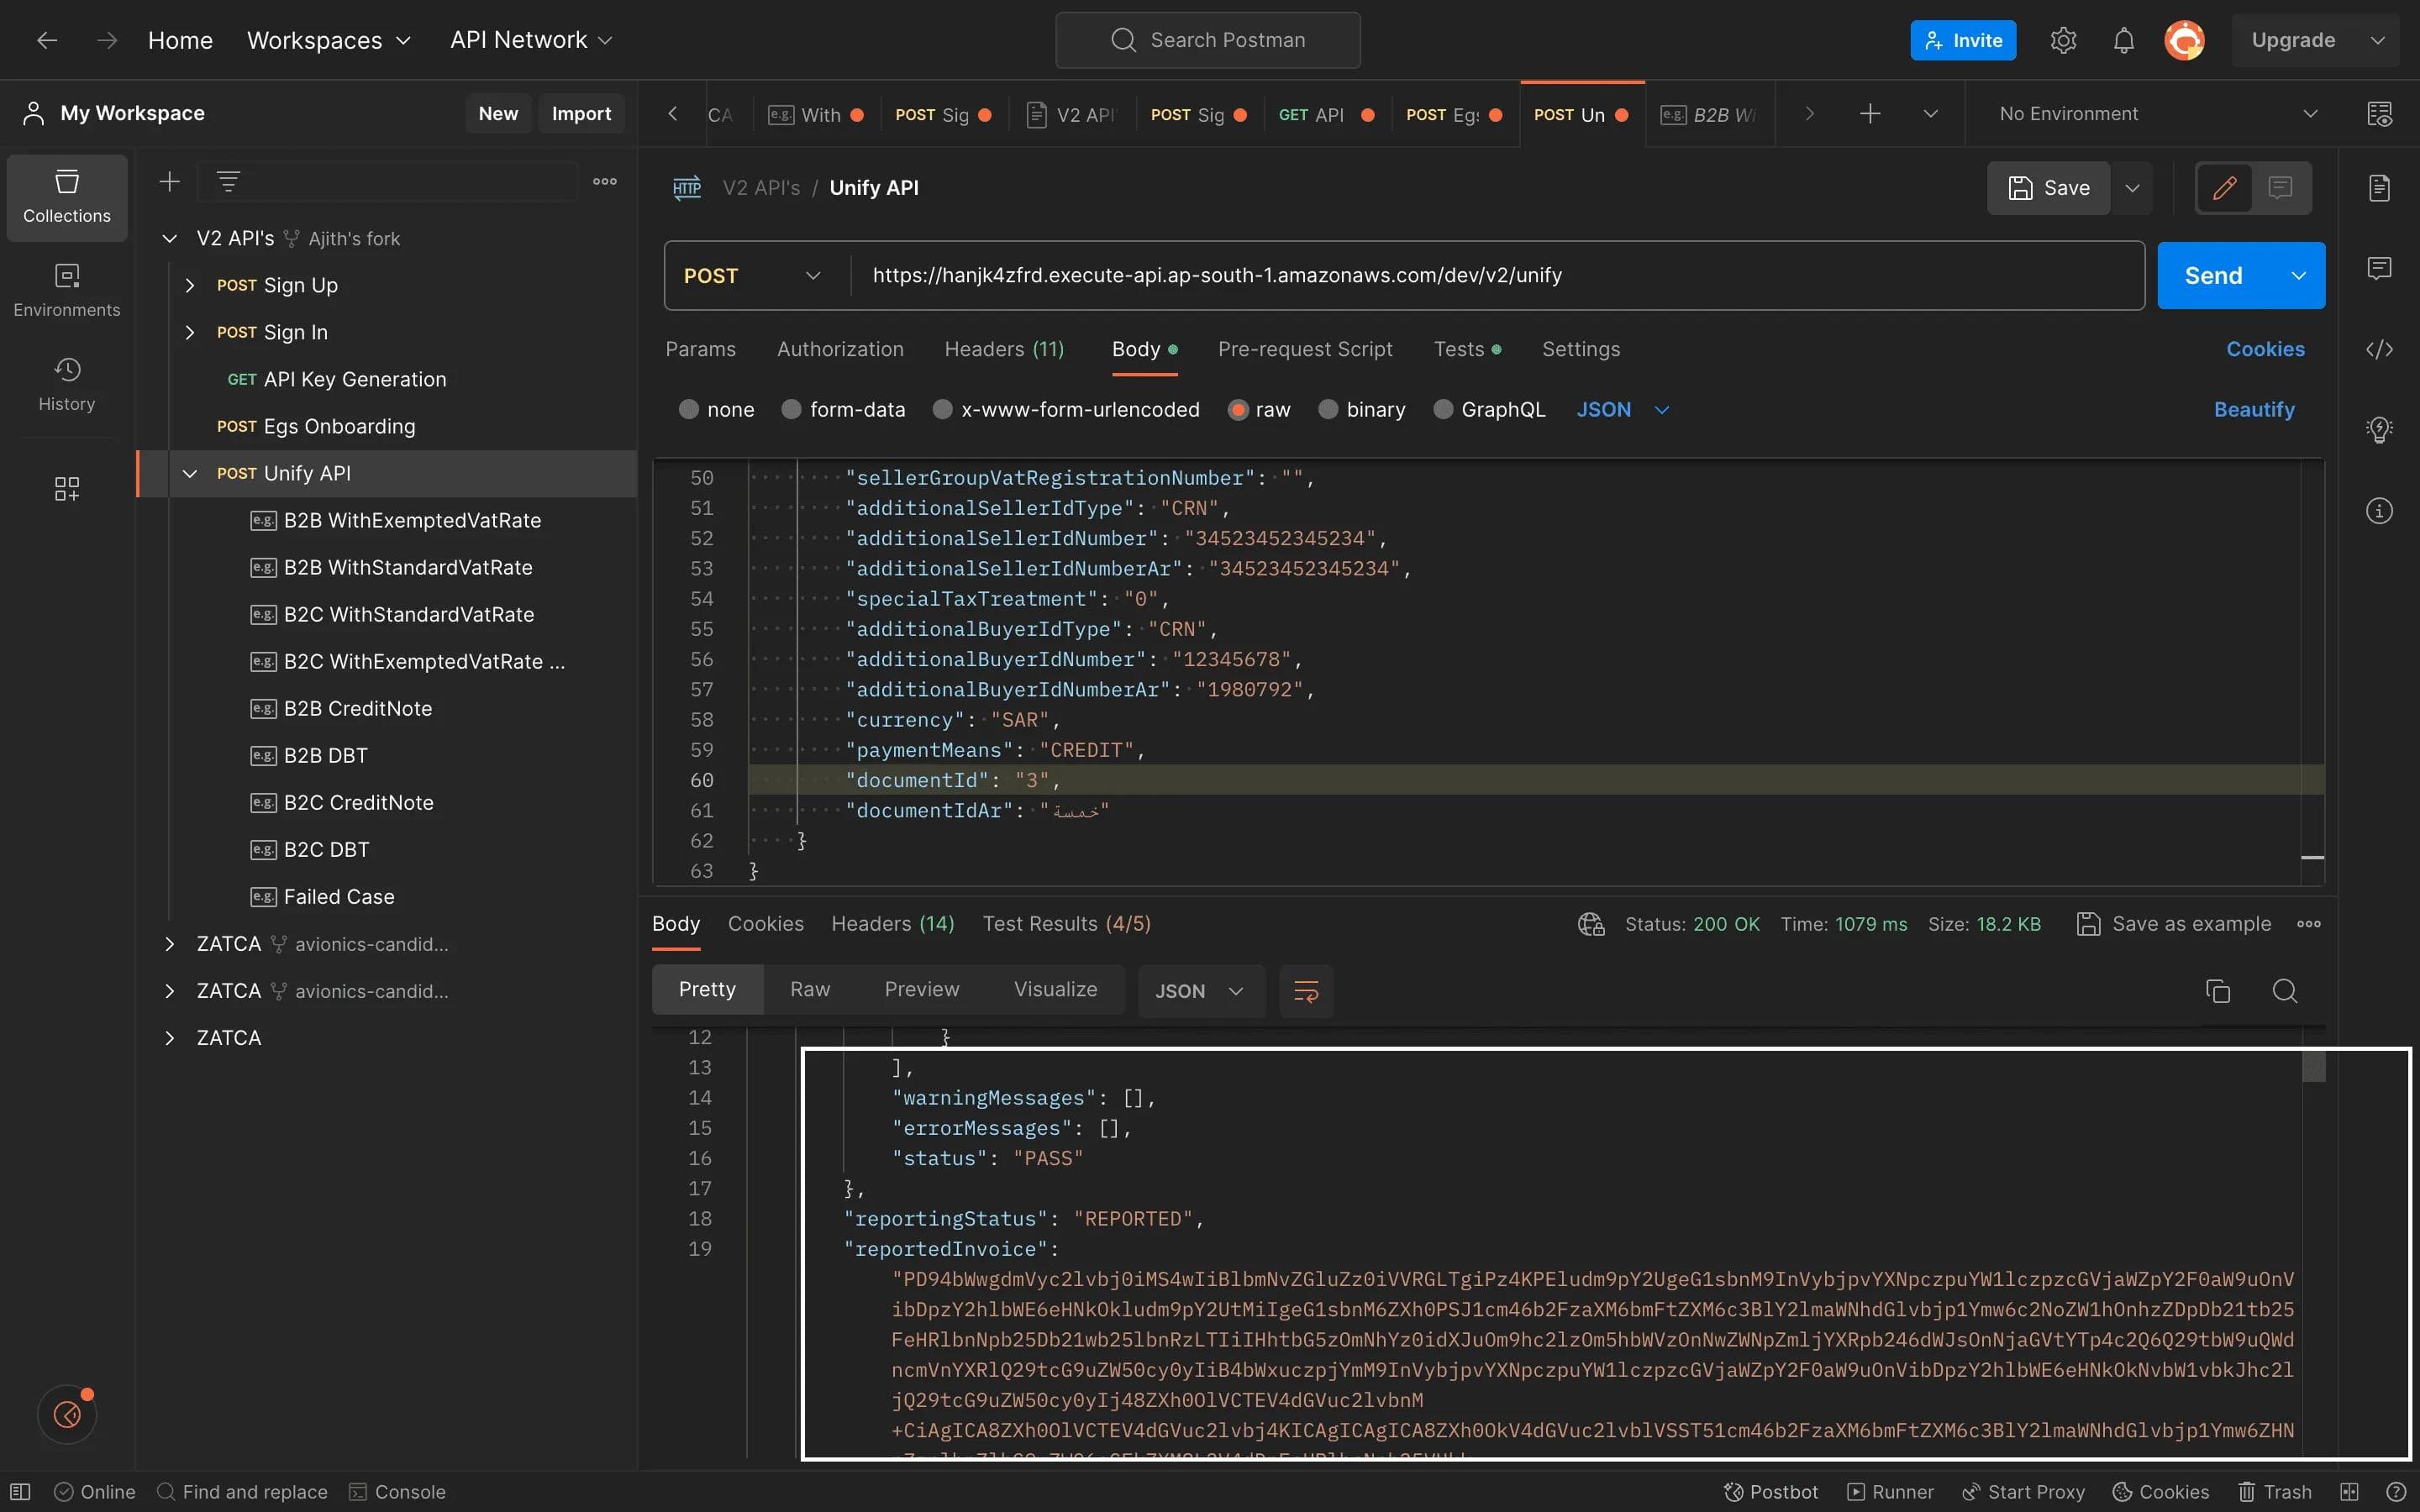
In our previous V1 version, we had separate APIs for various functions, including QR Code Generation, Clear Document, Reported Document, and Downloading PDFs. However, in our latest V2 version, we have streamlined and consolidated these functionalities into a single, unified API known as the "Unify API." This unified API encompasses Validation for both Business-to-Business (B2B) and Business-to-Consumer (B2C) transactions and QR code generation; on successful validation of B2C transactions the term “Reported” is used and “Cleared” term is used for B2B transaction validation. This consolidation simplifies the integration process and enhances the overall efficiency of our API services.
After successfully onboarding the "EGS eBMSTest12," you can proceed as usual. Simply use the Unify key for checking out the invoice type in the body section. The "documentType" options include:
"DOC_B2B_INV" for Business-to-Business Invoices
"DOC_B2B_CRD" for Business-to-Business Credit Notes
"DOC_B2B_DBT" for Business-to-Business Debit Notes
"DOC_B2C_INV" for Business-to-Consumer Invoices
"DOC_B2C_CRD" for Business-to-Consumer Credit Notes
"DOC_B2C_DBT" for Business-to-Consumer Debit Notes
Once you've set the "documentType," send the request. You'll receive a response indicating whether it has been Reported or cleared message. Additionally, you can download the PDF-encoded data associated with the transaction.
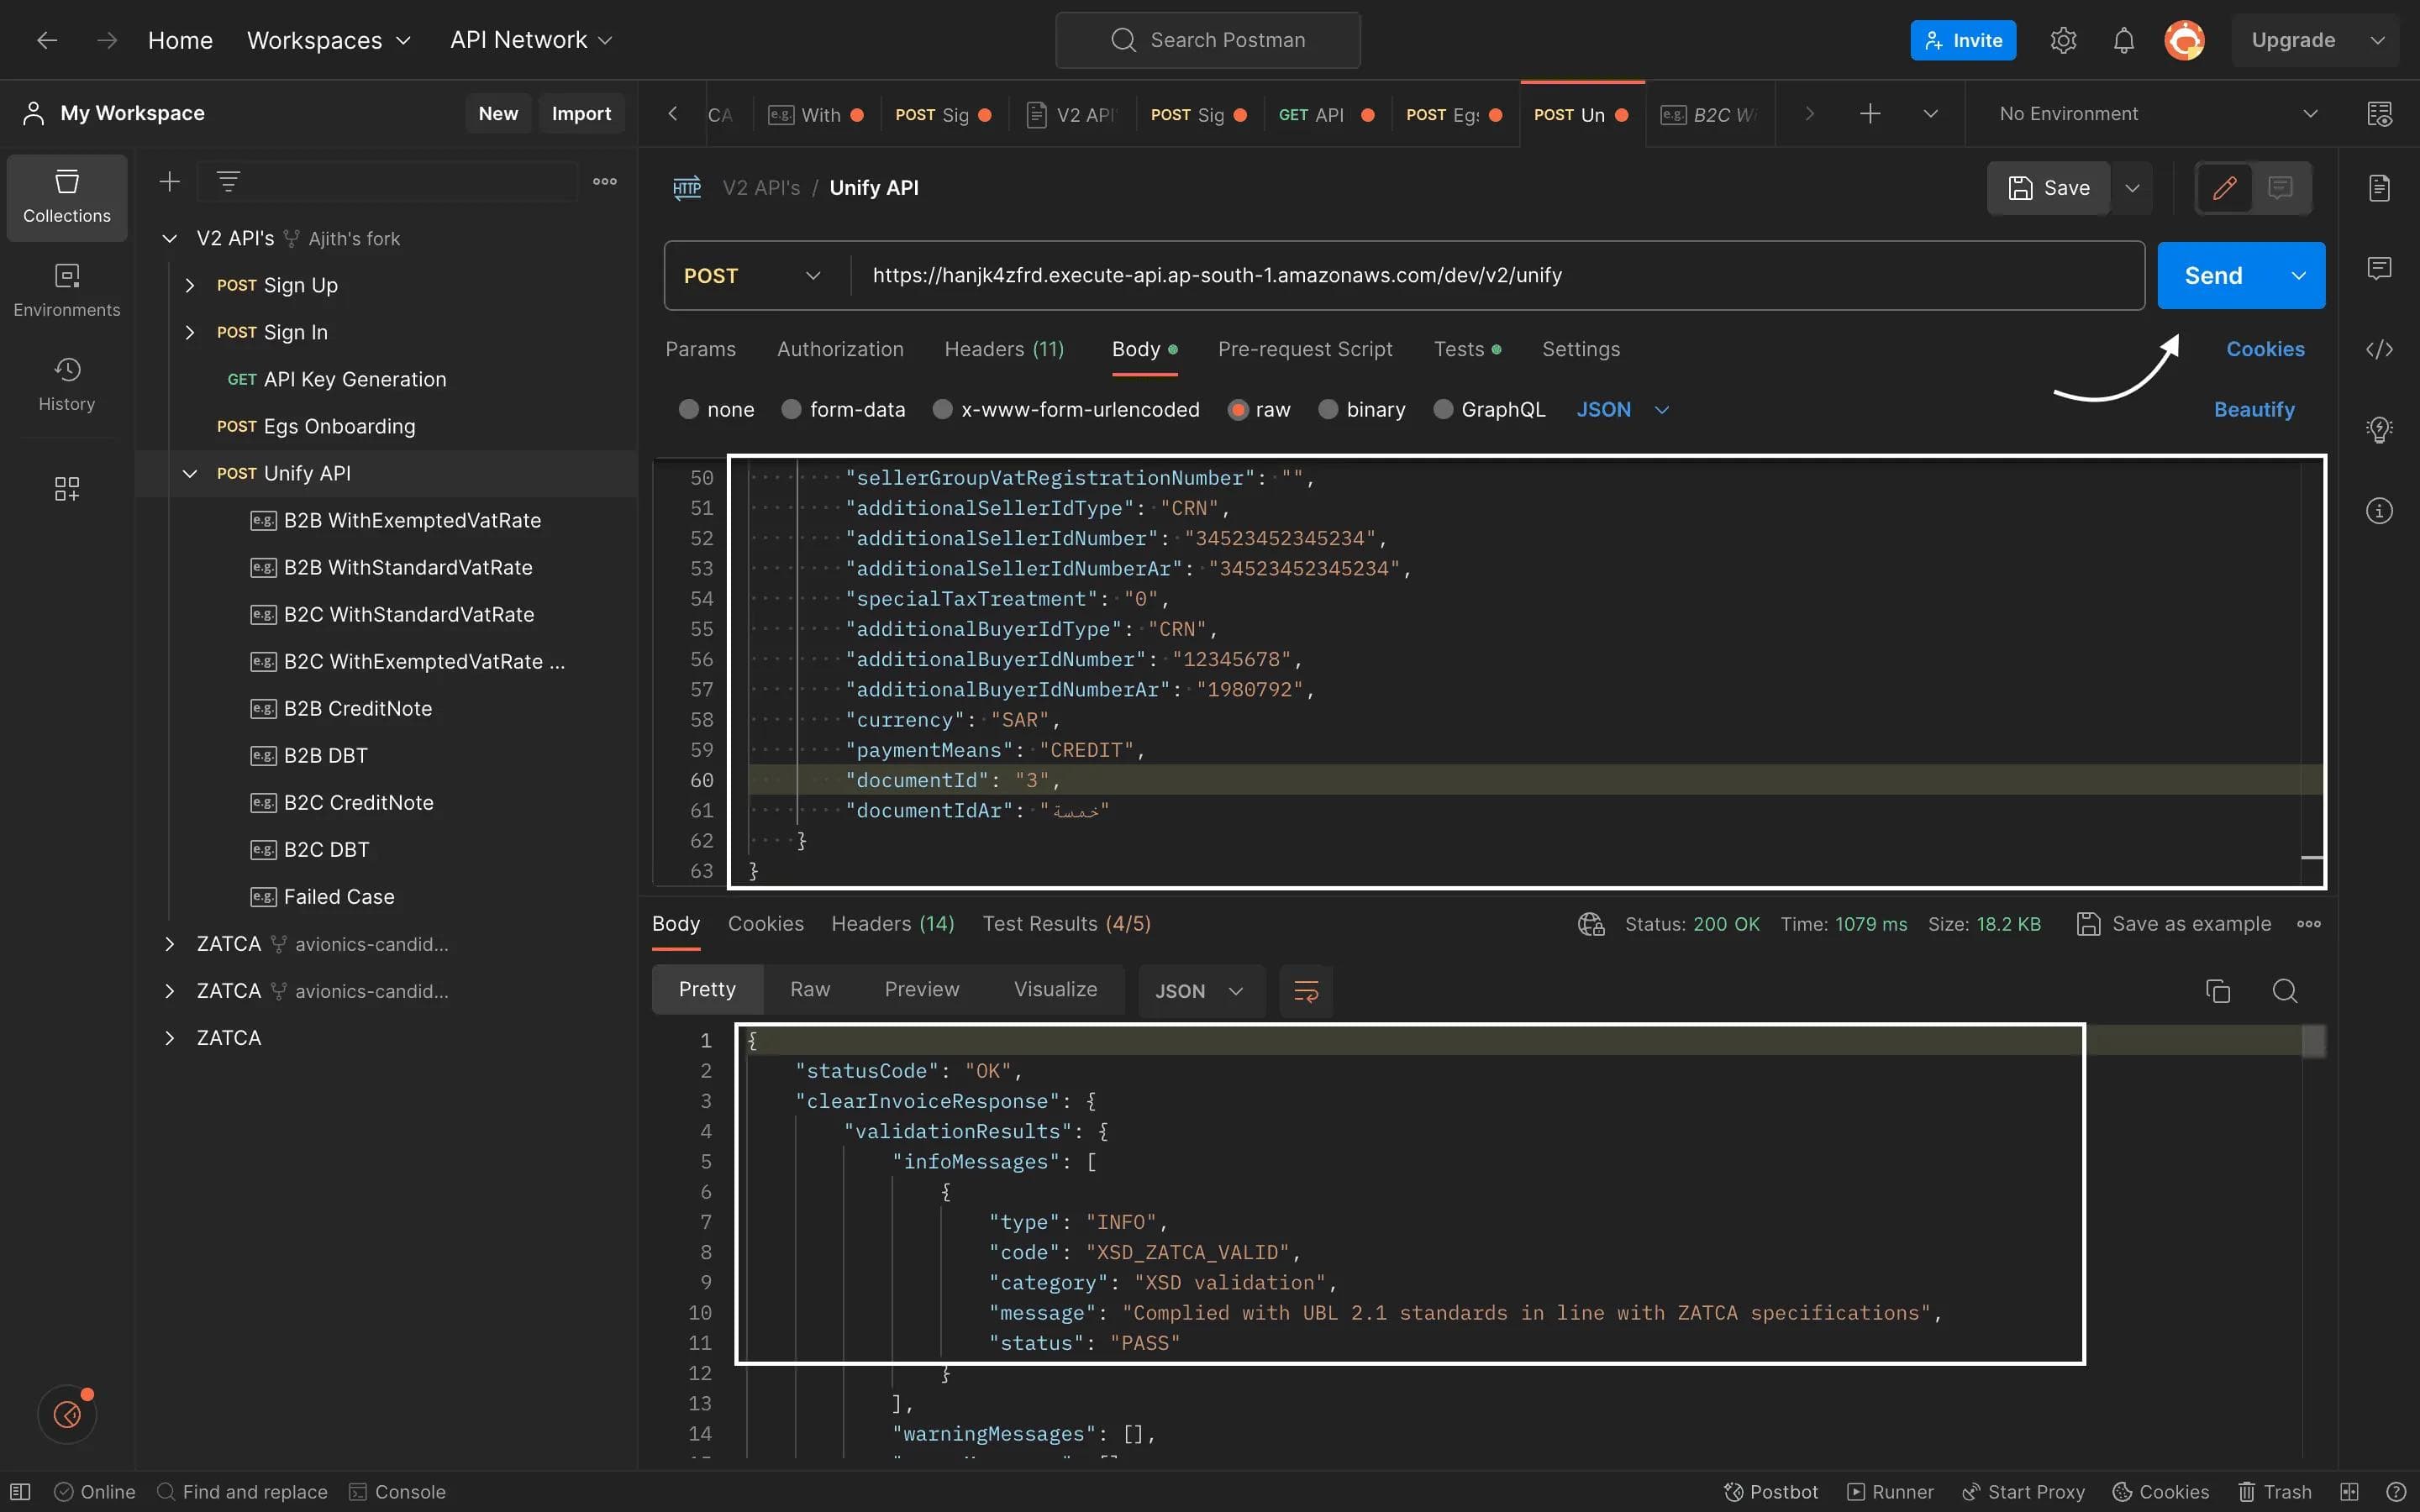
If you come across an error, like a missing "Document Item id" or any other issue, follow these steps for a solution: access the Unified API, expand it, choose "B2B With Standard VAT Rate" access the request body, copy the data, return to the Unified API, paste it into the request body, and then send it to retrieve the response.
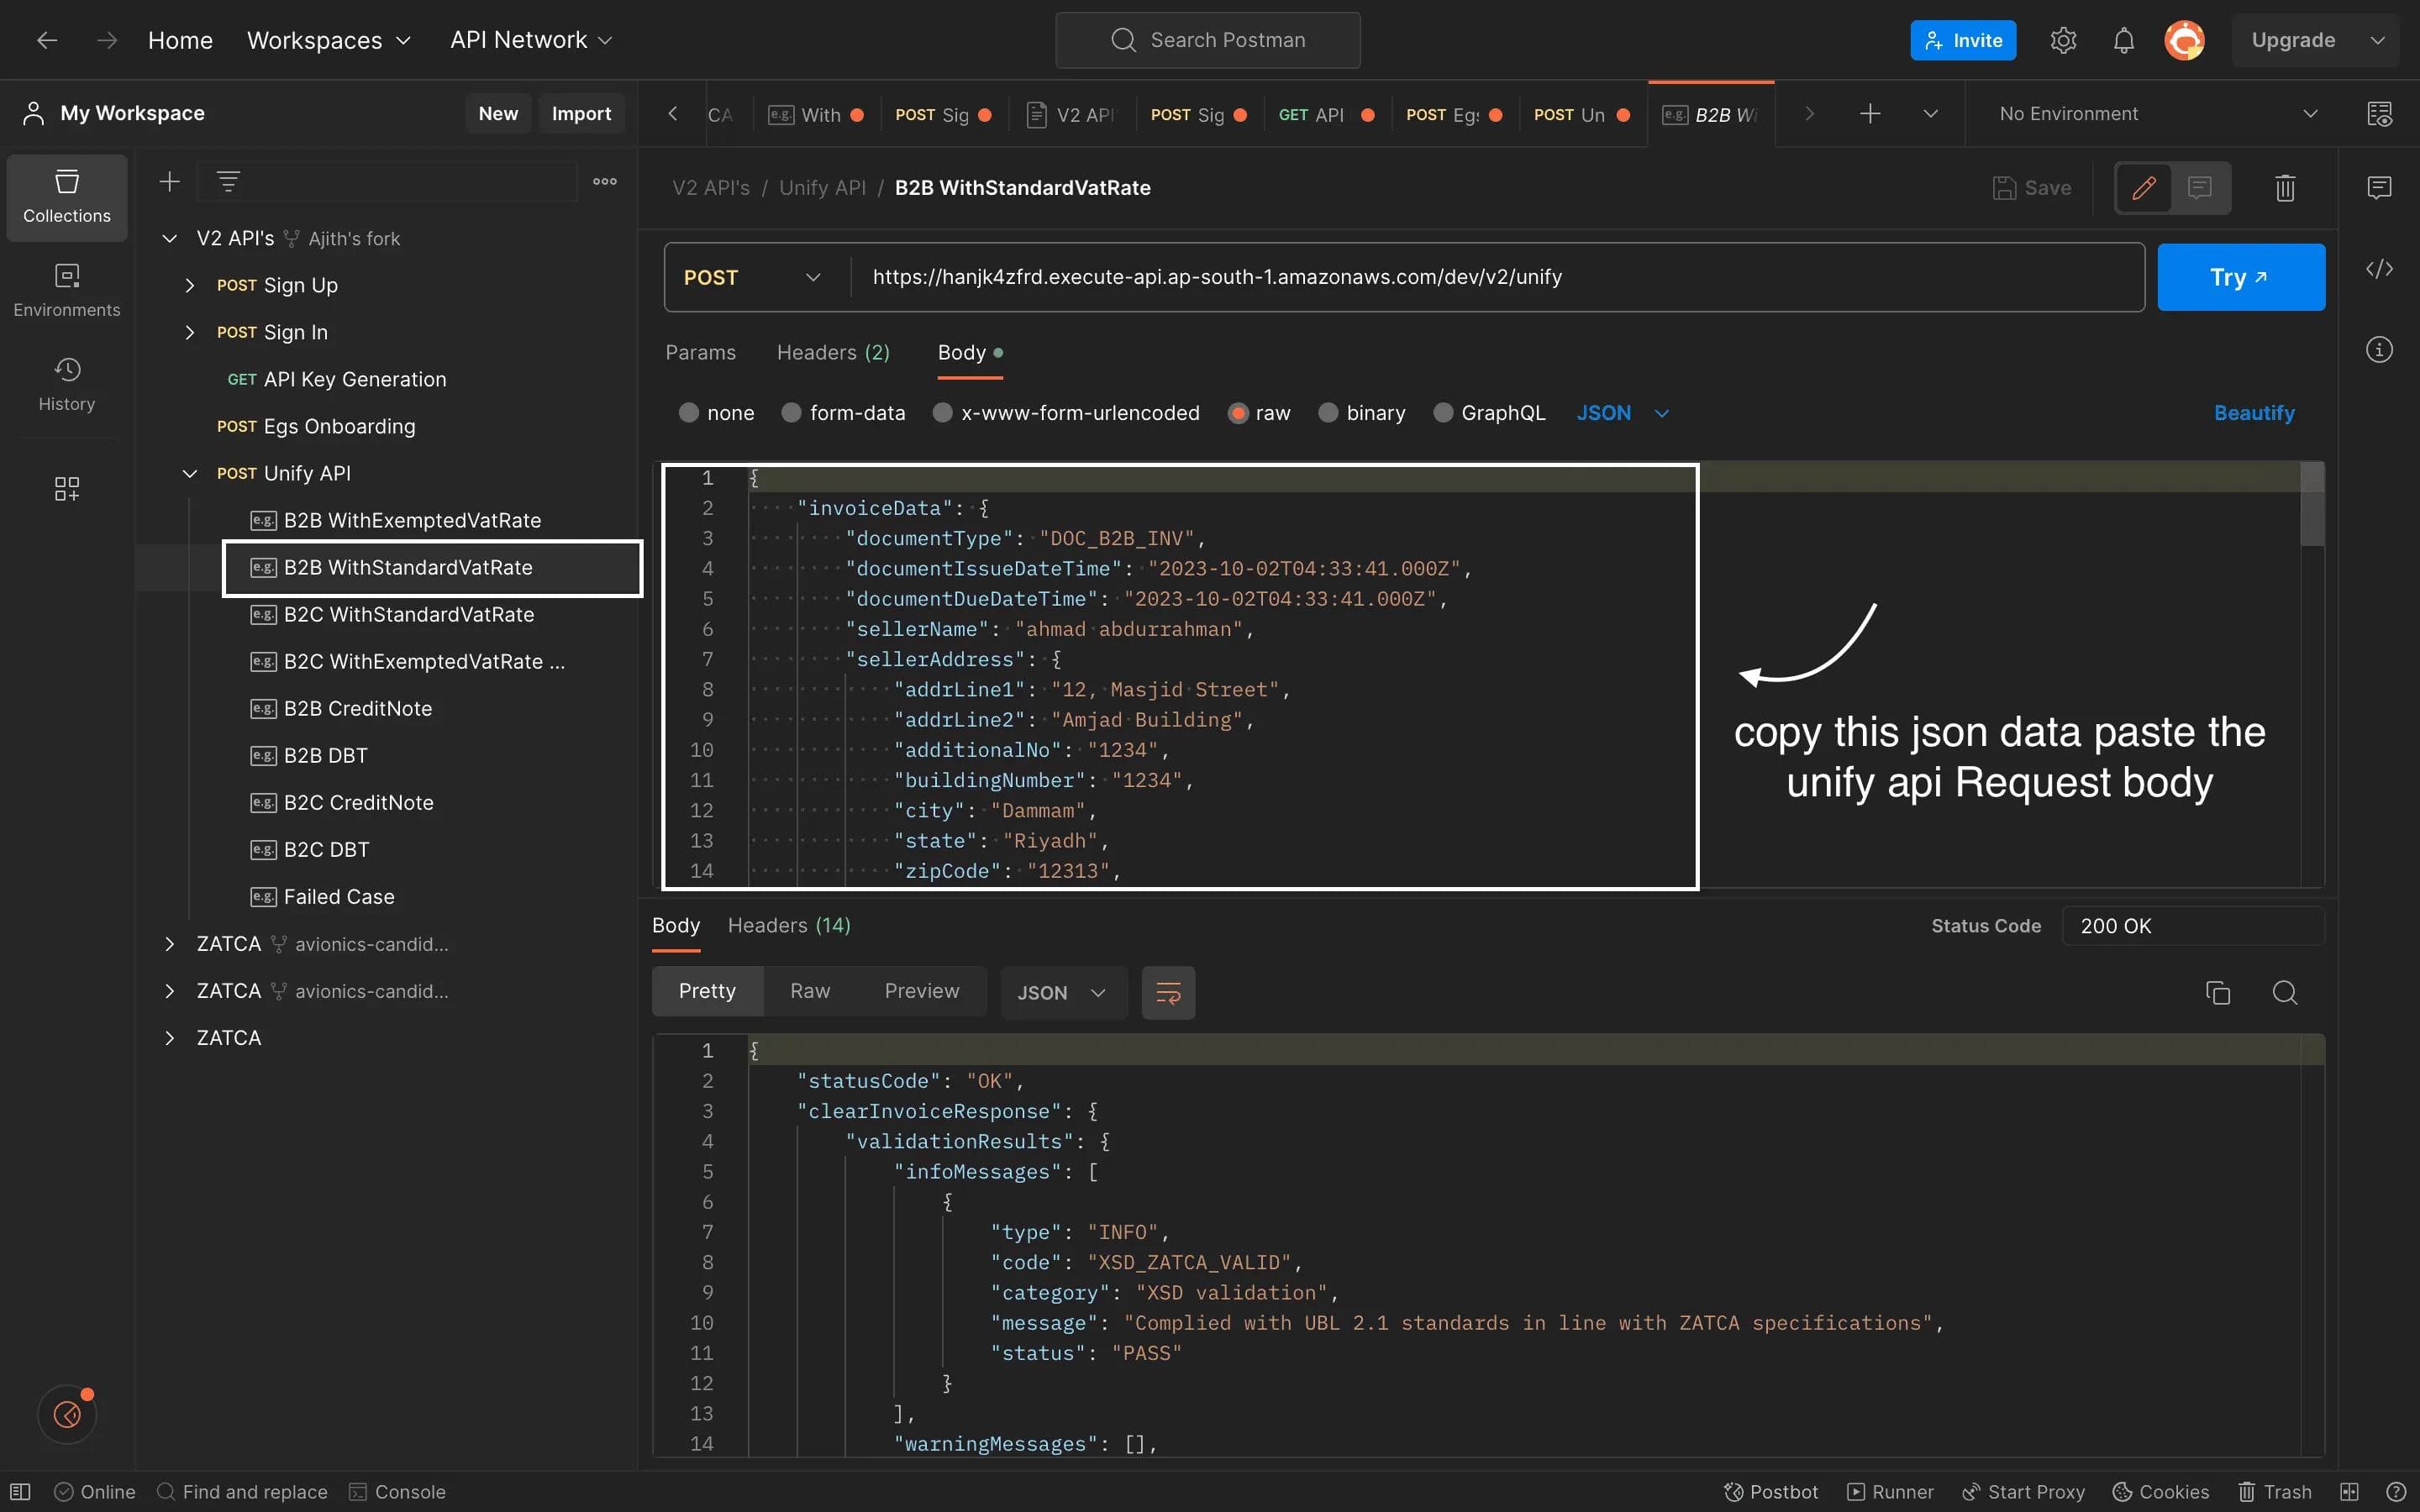
Request Parameters:
JSON Data Details Explanation
- invoiceData: Main container for the invoice data.
- documentType: "DOC_B2B_INV" indicates a Business-to-Business Invoice.
- referenceId: An optional reference ID for the document.
- documentIssueDateTime: Date and time the document was issued.
- documentDueDateTime: Date and time the document is due.
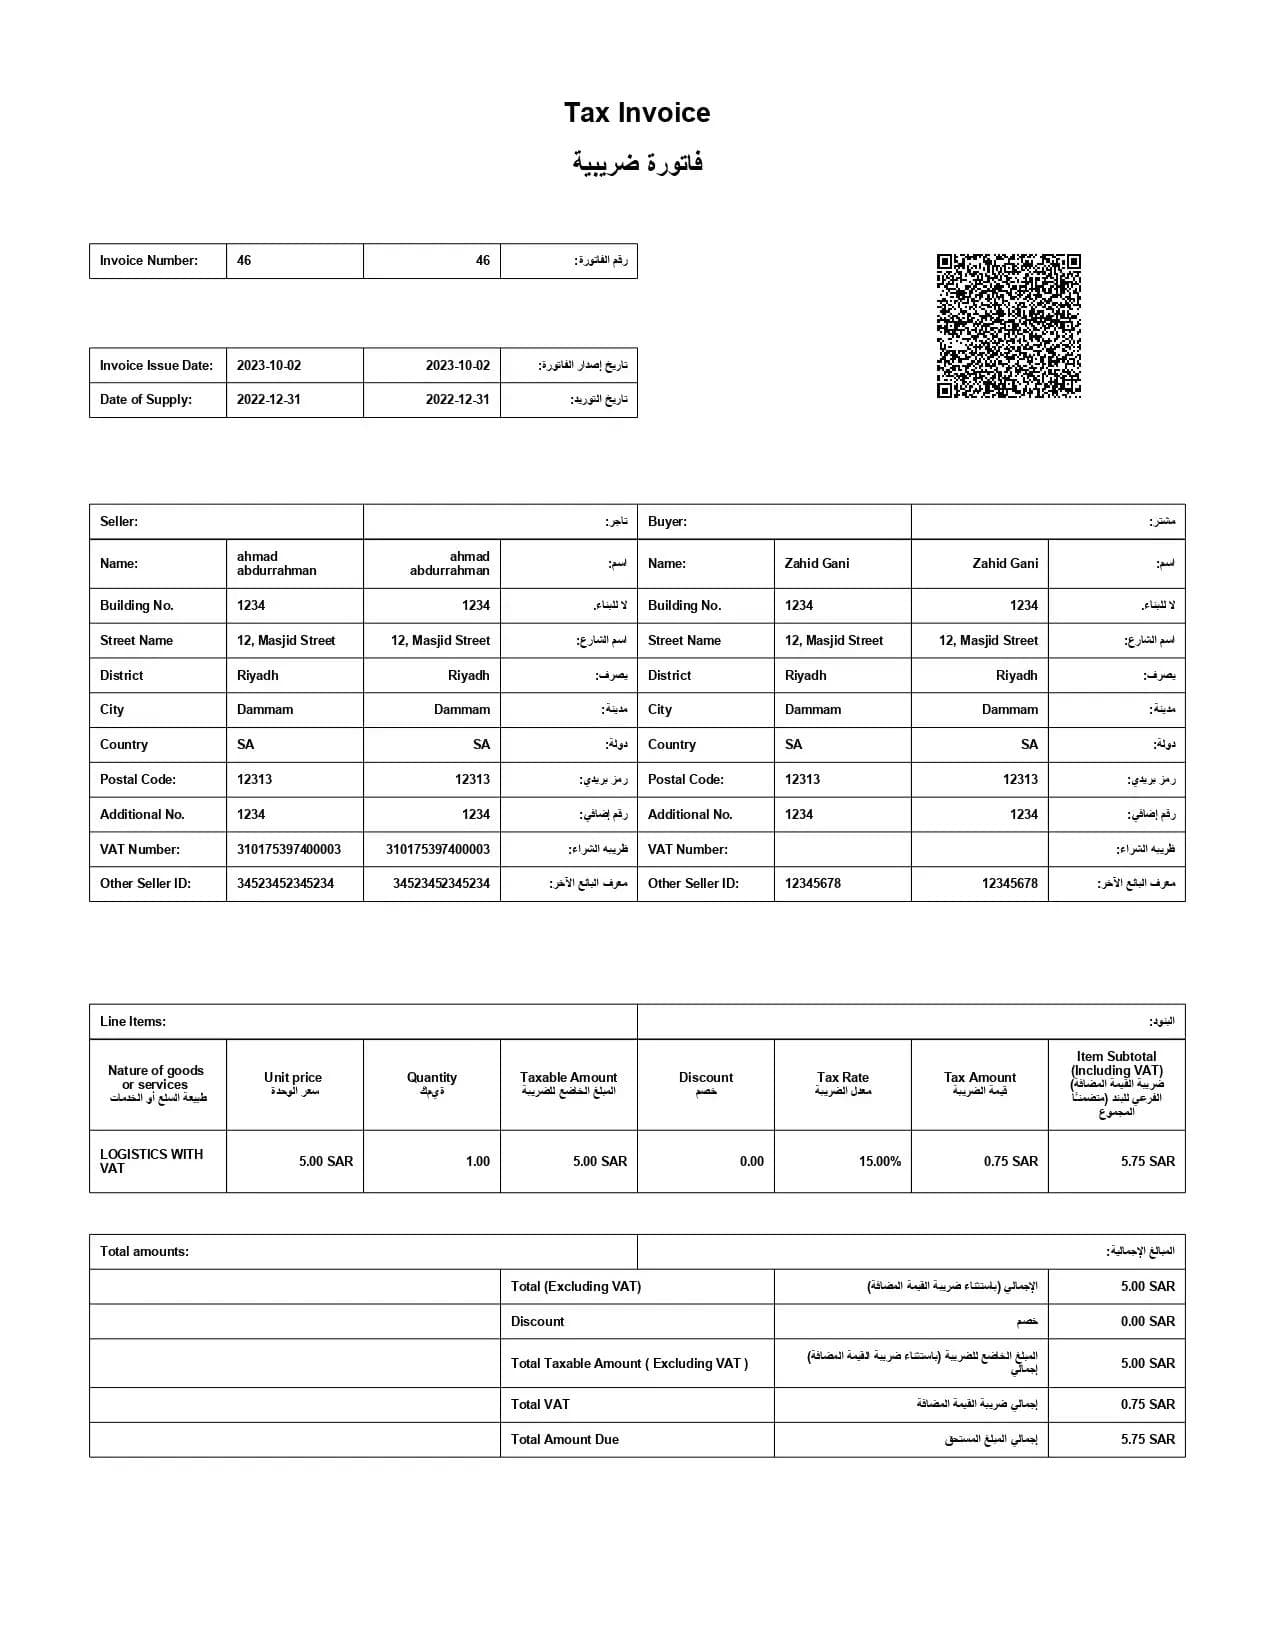
- sellerName: "ahmad abdurrahman."
- sellerAddress: Details including address lines, building number, city, state, zip code, district, and country.
- buyerName: "Zahid Gani."
- buyerAddress: Similar to the seller's address.
- documentLineItems: Array with details of line items including description, price, quantity, taxable amount, discount, VAT rate, VAT amount, and subtotal.
- totalExcludingVat: Total amount excluding VAT.
- totalTaxableAmountExcludingVat: Total taxable amount excluding VAT.
- vatTotal: Total VAT amount.
- documentTotal: Total amount including VAT.
- discountOnDocumentTotal: Any discount applied to the document total.
- isSpecialBillingAgreement: Indicates a special billing agreement.
- isTransactionType: Indicates the transaction type.
- isSelfBilled: Indicates a self-billed document.
- isThirdParty: Involves a third party.
- isNominalSupply: Indicates a nominal supply.
- isExport: Indicates an export document.
- isSummary: Indicates a summary document.
- supplyDate: Date of supply.
- sellerVatRegistrationNumber: Seller's VAT registration number.
- sellerGroupVatRegistrationNumber: Seller's group VAT registration number, if applicable.
- additionalSellerIdType: Additional seller ID type.
- additionalSellerIdNumber: Additional seller ID number.
- specialTaxTreatment: Special tax treatment indicator.
- additionalBuyerIdType: Additional buyer ID type.
- additionalBuyerIdNumber: Additional buyer ID number.
- currency: "SAR" for Saudi Riyal.
- paymentMeans: Payment means used, e.g., "CREDIT".
- documentId: Unique identifier for the document.
For Example:
Imagine you run a tech company called "TechGadget Co." based in Riyadh, Saudi Arabia. You've just sold a MacBook Air M2 to a business client, "ABC Electronics," located in Dammam, Saudi Arabia. Here's how the JSON data would represent this transaction:
documentType: "DOC_B2B_INV" (Business-to-Business Invoice)
referenceId: (Leave it blank for this example)
documentIssueDateTime: "2022-12-31T04:33:41.000Z" (The date and time when the invoice was issued)
documentDueDateTime: "2022-12-31T04:33:41.000Z" (The due date for payment)
Seller Information:
- sellerName: "TechGadget Co."
- sellerAddress: (Your company's address details in Riyadh)
Buyer Information:
- buyerName: "ABC Electronics"
- buyerAddress: (ABC Electronics' address details in Dammam)
Document Line Items (Items on the Invoice):
- lineItemDesc: "MacBook Air M2"
- lineItemPrice: 578.00 SAR (The price of one MacBook Air M2)
- lineItemQty: 1.00 (One MacBook Air M2 sold)
- lineItemTaxableAmount: 573.00 SAR (The taxable amount)
- discountOnLineItem: 5.00 SAR (A 5.00 SAR discount applied)
- vatRateOnLineItem: 15.00% (The VAT rate applied)
- lineItemVatAmount: 85.95 SAR (The VAT amount)
- lineItemSubTotal: 658.95 SAR (The subtotal for this line item)
- vatCategoryCode: "S" (VAT category code)
Total Invoice Details:
- totalExcludingVat: 573.00 SAR (The total amount excluding VAT)
- totalTaxableAmountExcludingVat: 573.00 SAR (The total taxable amount excluding VAT)
- vatTotal: 85.95 SAR (The total VAT amount)
- documentTotal: 658.95 SAR (The total amount including VAT)
- discountOnDocumentTotal: 0.00 SAR (No discount applied to the total document amount)
Other Details:
- isSpecialBillingAgreement: "false" (No special billing agreement)
- isTransactionType: "false" (Not a special transaction type)
- isSelfBilled: "false" (Not self-billed)
- isThirdParty: "false" (No involvement of a third party)
- isNominalSupply: "false" (Not a nominal supply)
- isExport: "false" (Not an export)
- isSummary: "false" (Not a summary document)
- supplyDate: "2022-12-31T04:33:41.000Z" (The date of supply)
- sellerVatRegistrationNumber: (Your company's VAT registration number)
- sellerGroupVatRegistrationNumber: (Leave it blank for this example)
- additionalSellerIdType: "CRN" (An additional seller ID type)
- additionalSellerIdNumber: "34523452345234" (An additional seller ID number)
- specialTaxTreatment: "0" (No special tax treatment)
- additionalBuyerIdType: "CRN" (An additional buyer ID type)
- additionalBuyerIdNumber: "12345678" (An additional buyer ID number)
- currency: "SAR" (Saudi Riyal as the currency)
- paymentMeans: "CREDIT" (Payment method used)
- documentId: 139 (A unique identifier for the document)
This structured information represents a detailed invoice for the sale of a MacBook Air M2 to ABC Electronics, meticulously outlining every aspect such as item description, pricing, applicable taxes, and transaction details, ensuring clarity and compliance with the required financial documentation.
200 OK: This common response code signifies that the request was successfully processed.
Response sample:
Understanding Error Codes in Complyance's APIs
When working with Complyance's APIs, you may encounter various response codes, each indicating a specific status of your request:
- 200 & 202 - OK & Accepted: Your request was successful, and you can expect a response. However, some APIs may return an error message if there's an issue with the data.
- 400 - Bad Request: Your request is not correct, possibly invalid or unsuitable for processing. Double-check the data you provided.
- 401 - Unauthorized: Validation issues are present. This often suggests a problem with your access token or credentials. Ensure their correctness.
- 404 - Not Found: The requested URI is invalid, or the resource you're looking for doesn't exist. Verify your request URL.
- 429 - Too Many Requests: You've exceeded the API call rate limit. Take a break and wait before making more requests.
- 500, 502, 503, 504 - Server Errors: Problems have occurred on the server-side. These could be due to syntax errors or incorrect request parameters. If this issue persists, contact our support team for assistance.
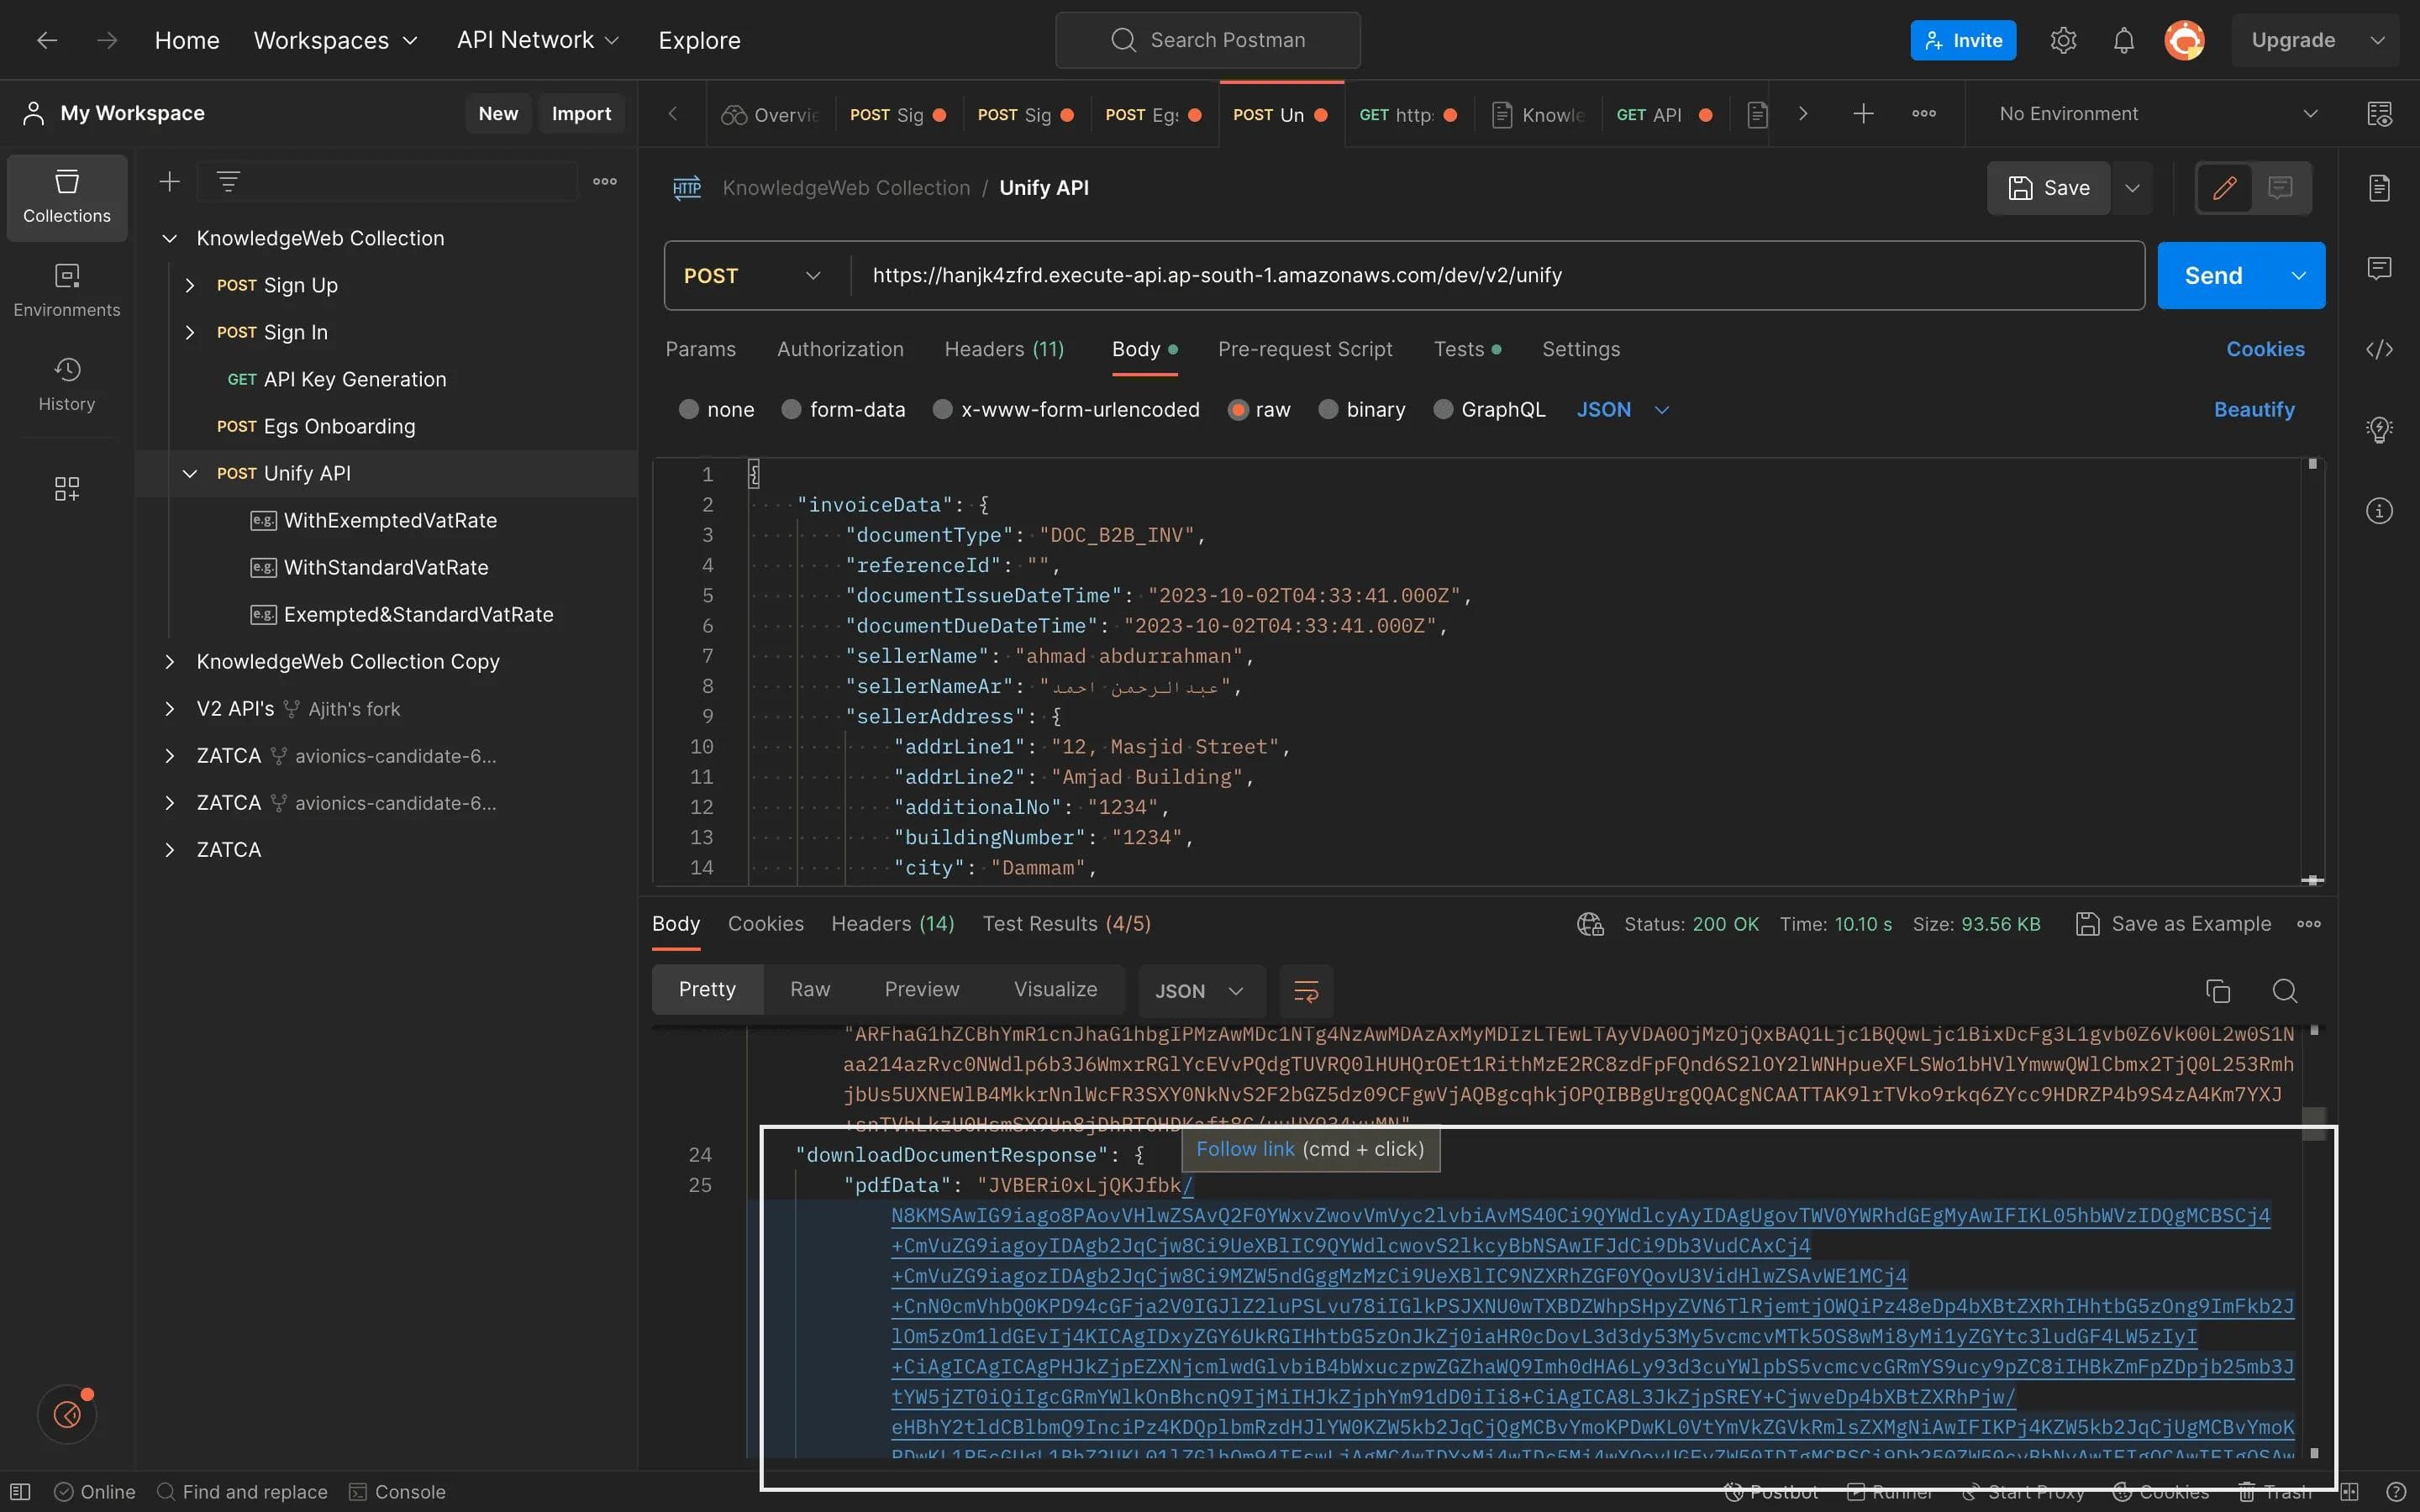
Downloading Documents from Complyance API
Before sending your request, ensure the Authorization header is in the Headers section. Once confirmed, proceed with the request to obtain the necessary base64 data.
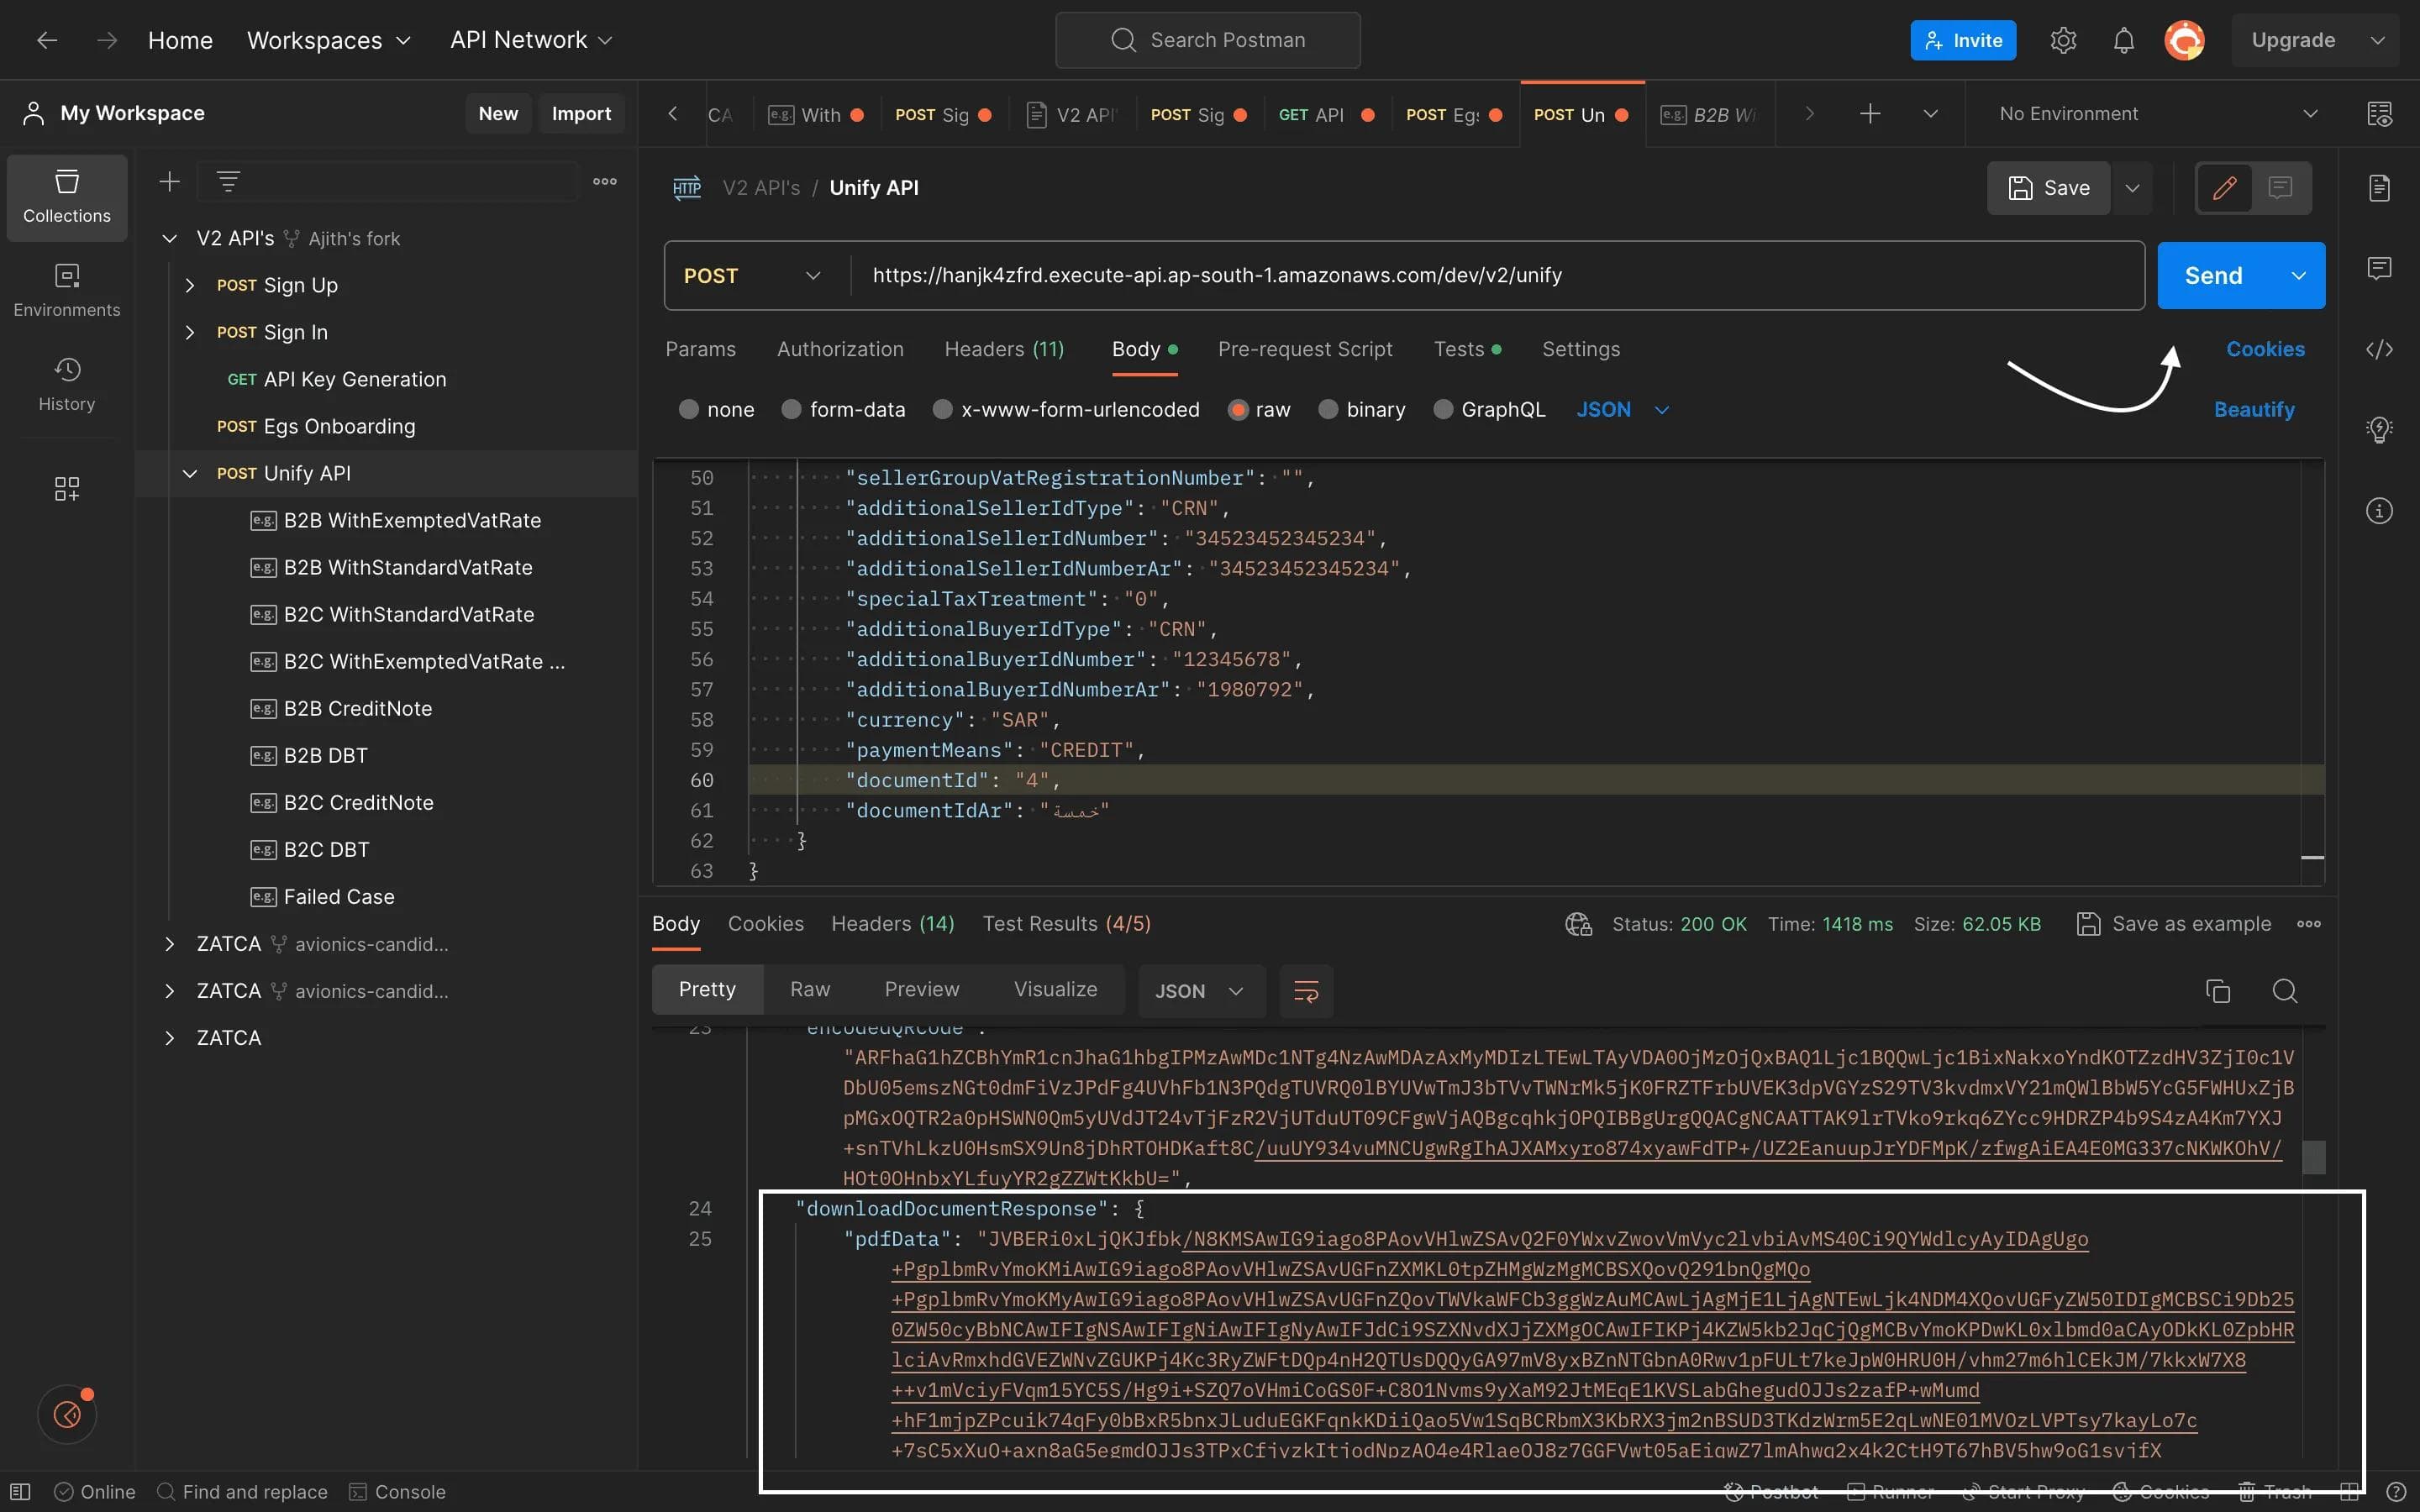
After receiving the base64 encoded data, you can decode it by visiting https://base64.guru/converter/decode/pdf or by searching "Base64 to PDF" in your preferred search engine. Paste the base64 data into the provided field and click "Decode" to download the PDF document.
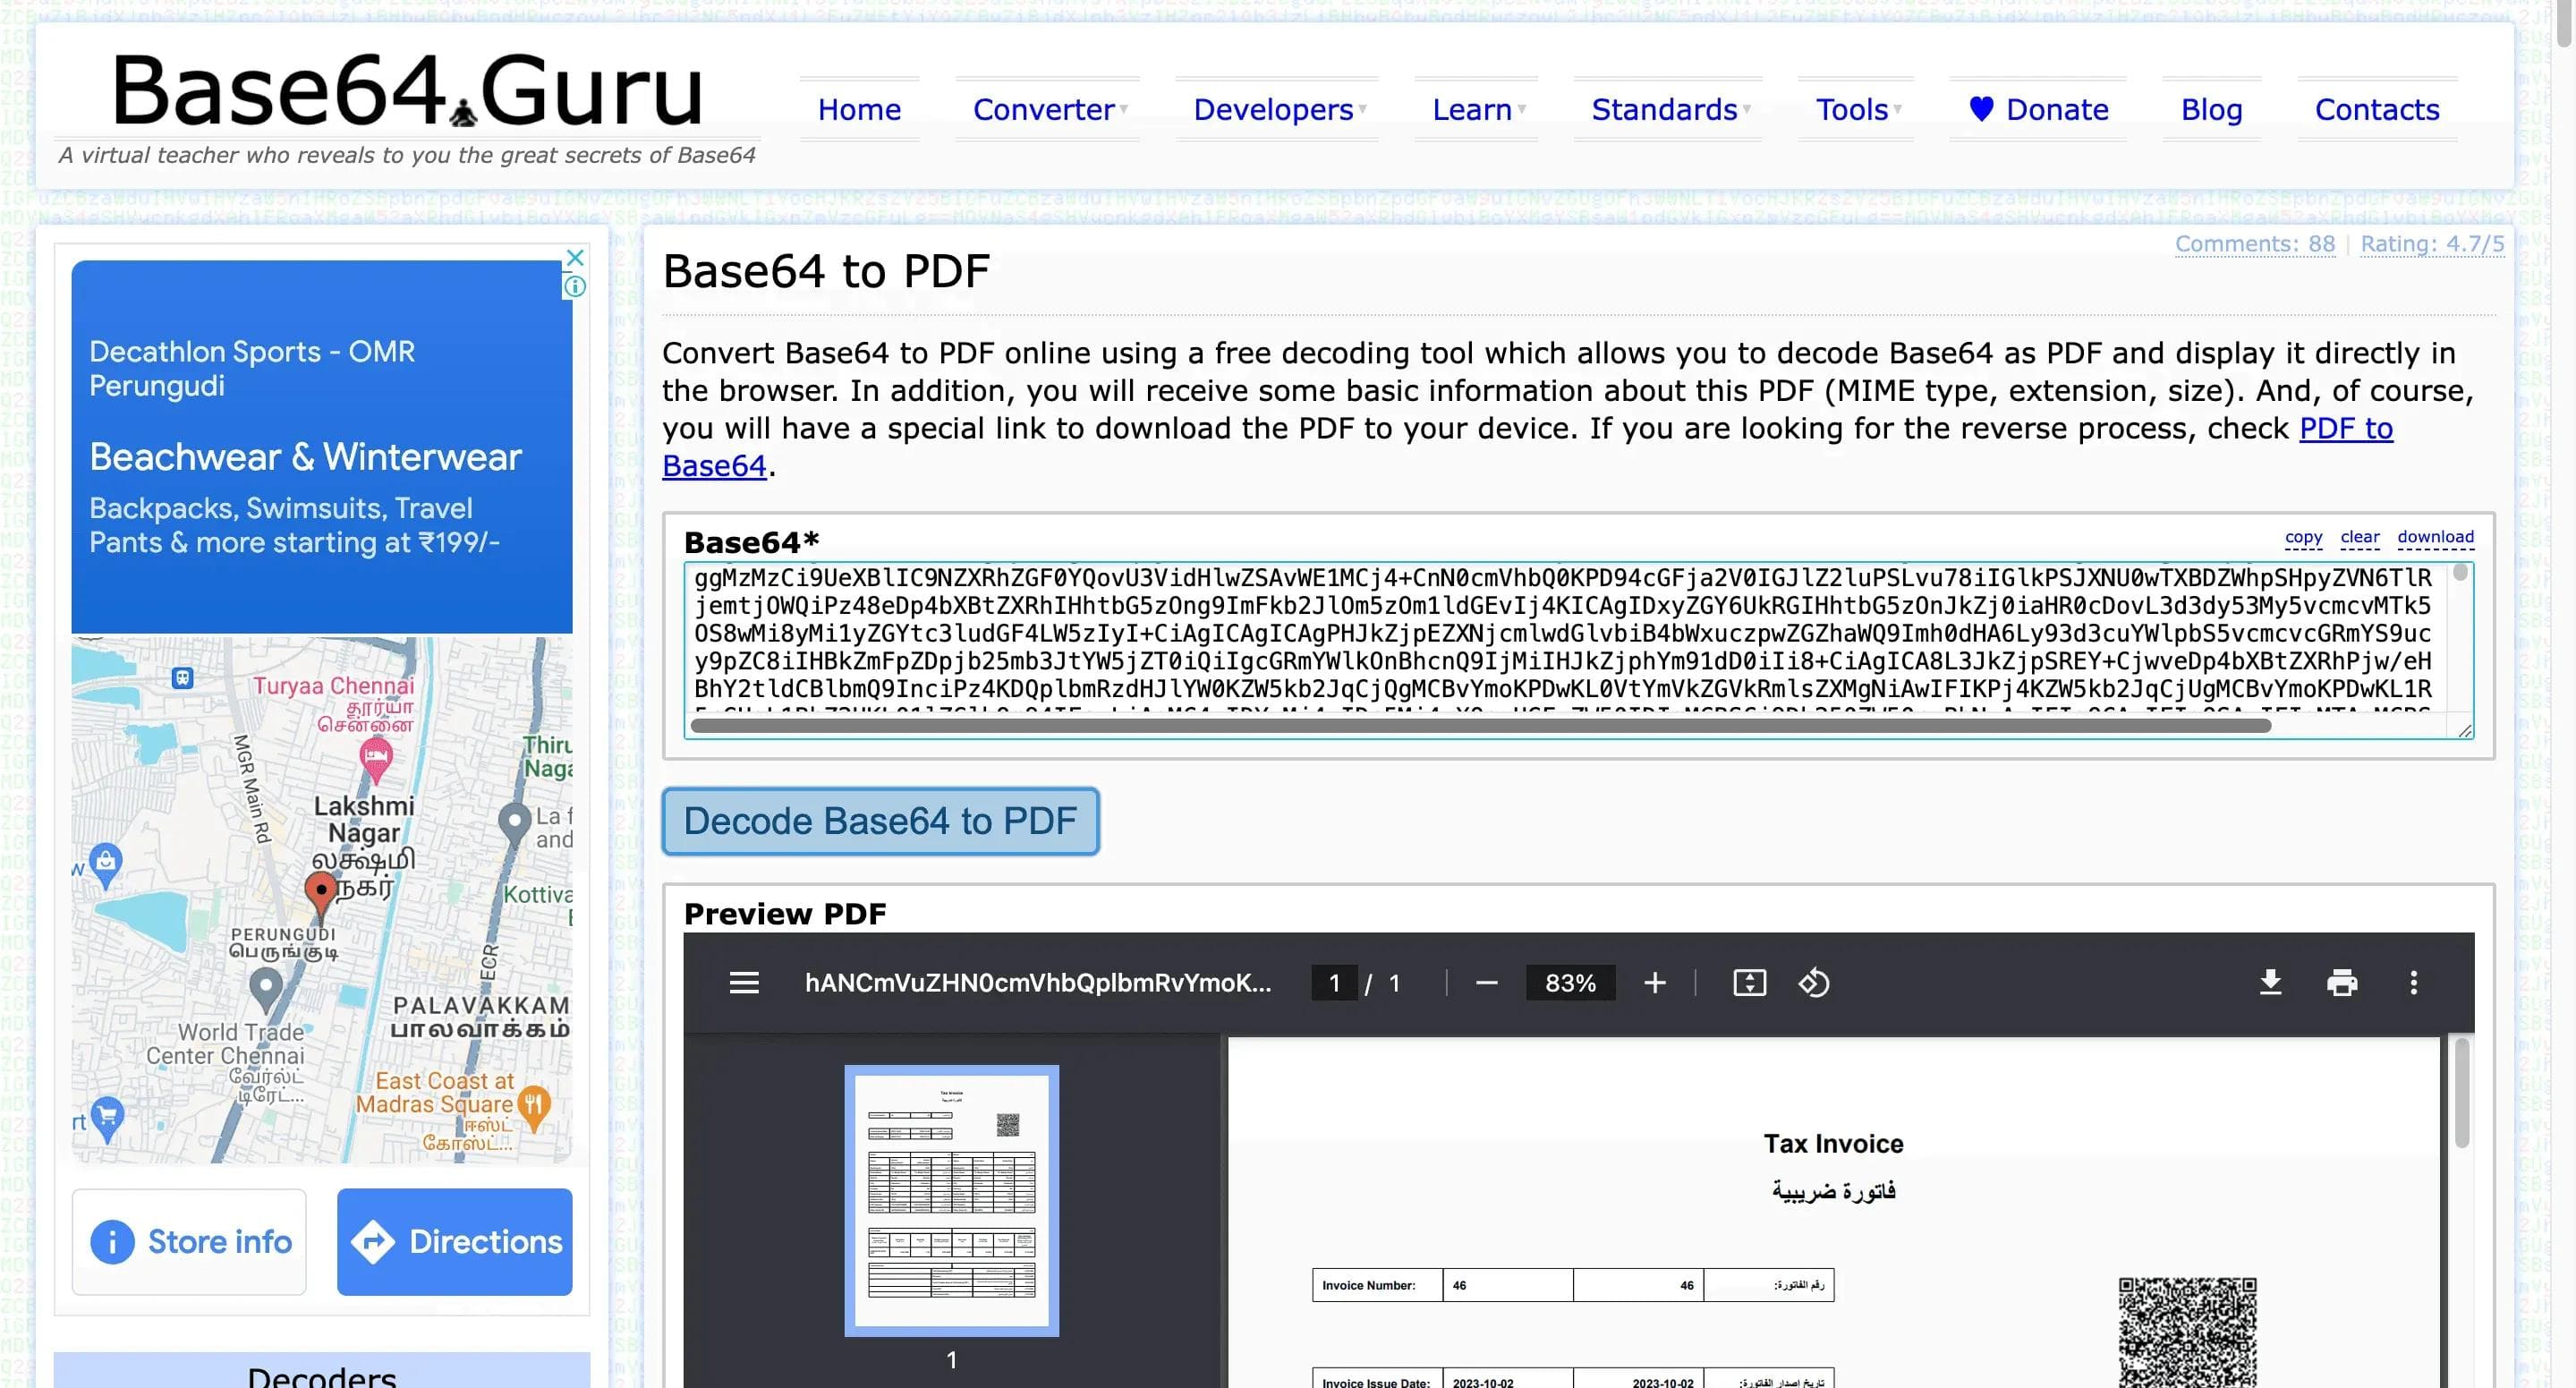
Sample Downloaded Document:
Need Help with Complyance's APIs? We're Here for You!
If you require assistance with Complyance's APIs, don't worry; we're here to help in a friendly and approachable way:
- Integration Information: Start by exploring this documentation for all the integration details you need. It's your go-to resource.
- API-related Support: If you encounter specific API-related challenges or questions, feel free to reach out to us at support@complyance.io We're responsive and ready to assist you.
- Other Issues: Have different concerns or inquiries? No problem. You can always contact us at support@complyance.io, and we'll address your needs.
Remember to review our comprehensive Terms of Service as well for a clear understanding of our policies and guidelines. We're here to make your integration experience smooth and successful!
Related posts


Frequently Asked Questions
E-invoicing, also known as electronic invoicing, is a form of billing that is presented to the buyer in an electronic format via a predefined structured data exchange. This electronic document exchange between buyer and seller can help streamline and automate portions of the accounts payable process.
About the Author

Ajith Kumar
Im a skilled content writer and SEO expert crafting engaging articles that rank. Passionate about making complex topics clear, discoverable, and valuable to readers.Dedicated to driving organic growth through high-quality, search-optimized content
Subscribe to our Newsletter
Get the latest compliance updates, e-invoicing news, and expert tips delivered to your inbox.
ABOUT COMPLYANCE
Empowering businesses to automate e-invoicing and stay compliant in 100+ countries. Our platform simplifies regulatory complexity for enterprises and fast-growing companies.
Go Live in a Week with Developer-Friendly Global E-Invoicing Platform
Complyance makes it easy for your IT/dev team to integrate once and automate E-Invoicing across 100+ countries. Built for fast deployment, field-level validation, and indirect tax accuracy—no delays, no rework.